The Email Layout defines the common visual design elements for all notification emails sent by your application’s workflows. You can define optional banner and footer content, and set the background color of each area. The subject and body content of each email notification will be defined by it’s Email Template in the related application.
Email Layout Editor
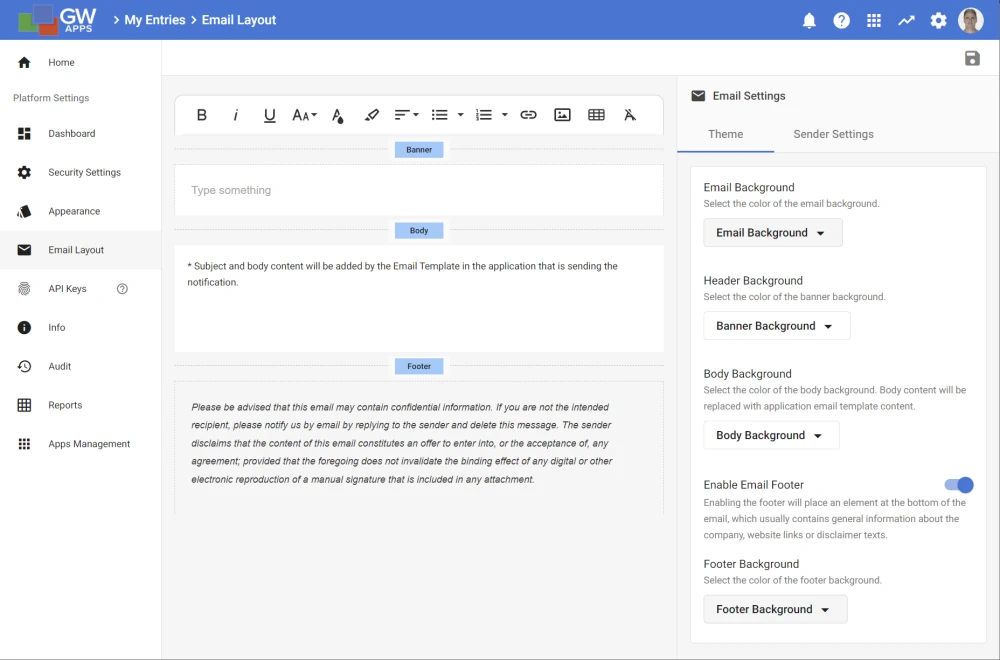
The Layout Editor is much simpler than the Email Template Editor, as there are far fewer things that you can define. You can add content (formatted text, images, tables, links, etc.) to the Banner area and the optional Footer area. You can use the menu bar at the top of the editor to change fonts, text size and color, add tables, images, links, and more.
| Email Layout Editor – Theme Tab |
 |
| Item | Description |
| Banner | The Banner area appears immediately above the body content in the received emails. It’s a good place to put a graphical header or other visual elements. You can’t disable the Banner area, but if you don’t enter any content it will have no effect. |
| Footer | The Footer area appears immediately below the body content in the received emails. It’s a good place to put disclaimers or other legal messages. The Footer can be enabled/disabled from the right-side Email Theme Properties Panel. It must be enabled before you can enter content. |
| Email Theme Properties Panel | Has settings for the background color of each area and to enable the Footer. It has the following settings: |
| Email Background | The overall background color. Just set this color, and leave the others blank, if you want to have an overall background color. If other background colors are set, the Email Background was still be visible as a border around the other colors. |
| Banner Background | The background color for just the Banner area. |
| Body Background | The background color for just the Body of the email. |
| Enable Email Footer | Allows you to enable/disable the Footer area. |
| Footer Background | The background color for just the Footer area. |
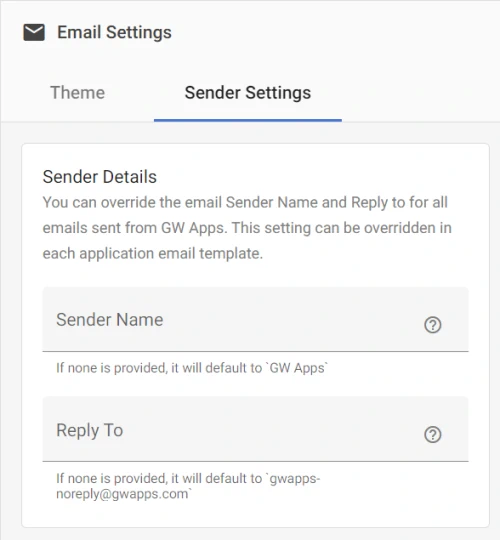
| Email Layout Editor – Sender Settings Tab |
 |
| Item | Description |
| Sender Name | Sets the name emails appear to be sent by. This setting applies to all email templates on the platform that do not have their own specific value set. The sender name will be ‘GW Apps'”‘ if the sender name is not set in this platform setting or in the email template. |
| Reply To | Sets the name put in the To field when somebody replies to an email. This setting applies to all email templates on the platform that do not have their own specific value set. The reply to name will be ‘gwapps-noreply@gwapps.com` if Reply To is not set in this platform setting or in the email template. |
 | Before leaving the Email Layout Editor, make sure you save any changes you have made by clicking the floppy disk icon in the top right corner of the editor. |
Next Steps
As mentioned at the beginning, these settings only define some common visual elements fir your email templates. To learn more about creating email templates in your applications, click here.
