GW Apps has an API that allows authorized external systems to read and modify records by using a RESTful web service. Defining an API key is how you let GW Apps know that specific forms within the application can allow API access, and which operations the API is allowed to do. In this article we’ll discuss how you can create and generate API Keys for your applications. We’ll also discuss API Key configuration options.
API Key Overview
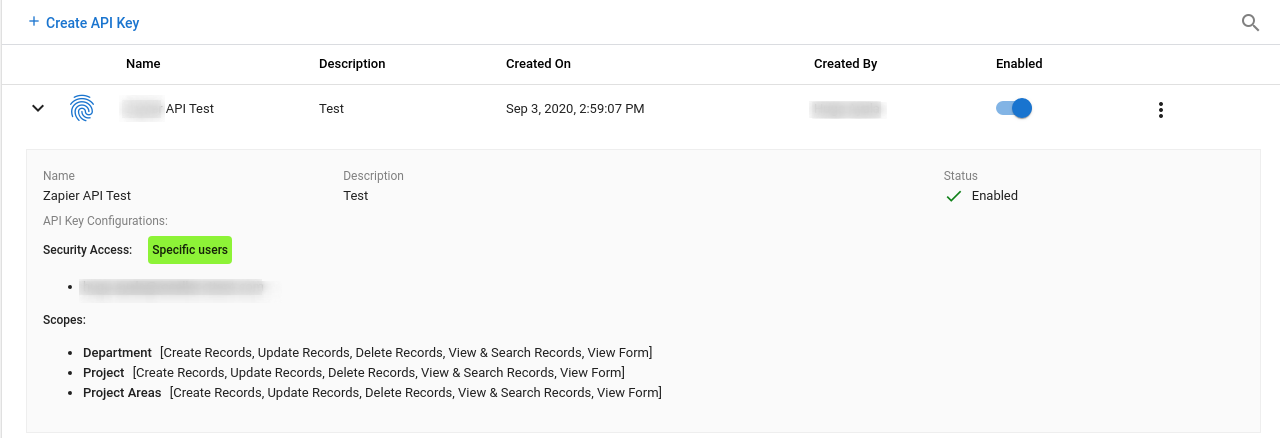
API Keys allow the creation of RESTful endpoints that will make records of a given form accessible and editable via a web service.
| API Keys |
 |
 |
| Item | Description |
| + Create API Key | Create a new API Key. |
| Name | Name of the API Key. |
| Description | Brief description of the API Key. |
| Created On | Date when the API Key was created. |
| Created By | User that created the API Key. |
| Enabled | Toggle option to enable/disable access using this API Key. |
| Click on a row | When you click on an API Key row in the list, a panel will expand below the row with summary details about the API Key’s configuration. |
| Click on the three-dot menu to see further options. | |
| Generate New Key | Generates a new security key for the API Key configuration. This will invalidate the prior key, so you will need to share the new key with developers of services that access this API. |
| API Reference | Link to documentation on how to call the RESTful API endpoints for the specified form |
| Edit | Edit the selected API Key configuration. |
| Remove | Deletes the selected API Key configuration. |
Creating an API Key
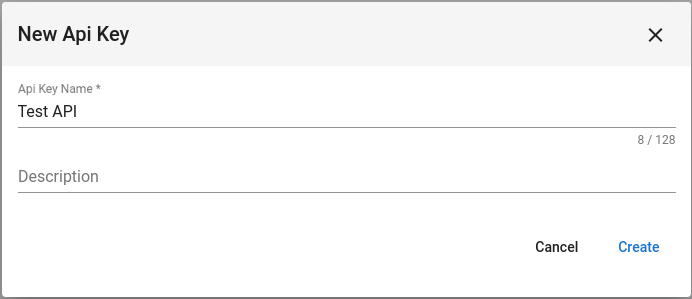
Create a new API Key by clicking the ‘+ Create API Key’ button and completing the displayed pop-up dialog form:
| Creating an API Key |
 |
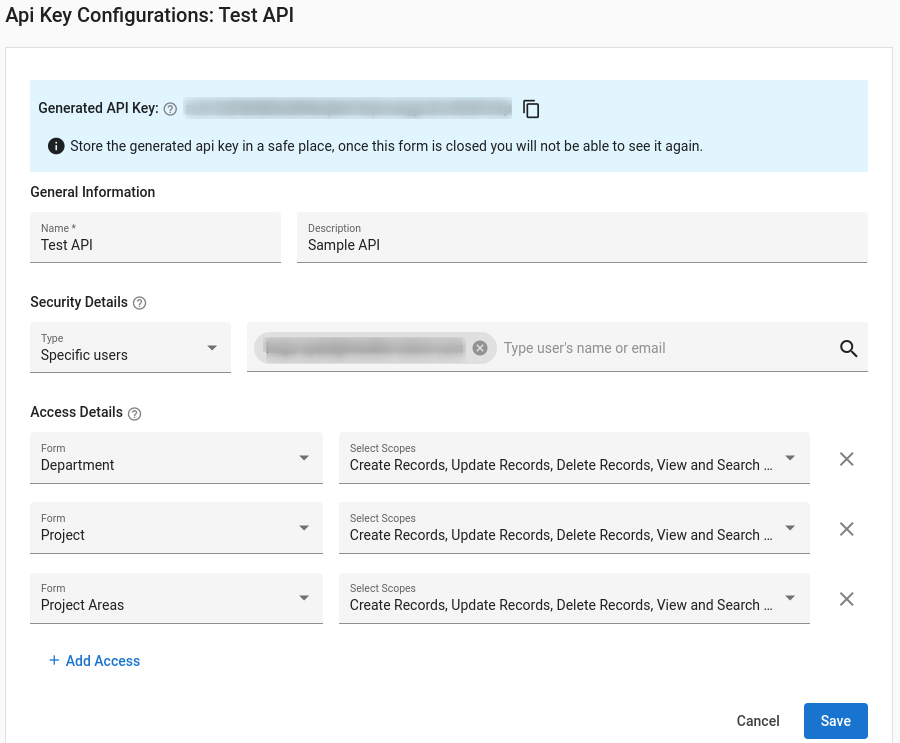
Once you have entered the new API key’s name, and optionally added a description, and clicked ‘Create’, you will see the API Key Editor with your new key loaded so that you can complete it’s configuration:
| Create API Keys |
 |
| Item | Description |
| Generated API Key | String that represents the generated API Key, this will show only when the key is first created, so it is strongly advised write it down in a safe place as it won’t be visible once you save and leave the screen. |
| Name | Name of the API Key. |
| Description | [Optional] Description of the API Key. |
| Security Details | |
| Type | Select ‘All domain users’ to allow anybody to execute an API call, or ‘Specific users’ to allow only specific people access to the API key. |
| User email | Search email address of users within the domain to grant them access to use this API Key. (Hidden if ‘All domain users’ is selected for Type.) |
| Access Details | |
| Form | Select a form from the current application that will be accessible via this API key. (When a new API Key is created, all forms within the application will be added to the list of forms under Access Details.) |
| Select Scopes | Sets the scope or permissions allowed for the records for the selected form. Options are: – Create Records – Update Records – Delete Records – View and Search Records – Export Records to PDF – View Form (When a new API Key is created, each form will have all Scopes enabled. You can deselect Scopes to disable the permission,) |
| Add access for an additional form from this application. | |
| Cancel | Cancel changes |
| Save | Save API Keys |
API Key Configuration Best Practices
API keys are a simple encrypted string that can be used to generate a bearer token, that will in turn be used to call GW Apps APIs related to your applications. Make sure that you keep all your keys secure. Publicly exposing your credentials can result in your data being compromised.
API Key Configurations
While generating your API Key, you can configure the following security options:
- Restrict your API keys to allow only specific email addresses: We recommend creating API Keys using the ‘Select users’ Type, and then selecting only the email addresses of users you want to access records via the API. The API will retrieve data based on the selected user(s) that the token was generated with, so the API will only have access to the same data in this app that the selected user(s) have access to. You can also select ‘All domain users’ which will allow you to act as any user in GW Apps, and hence have full access to all data for the listed forms.
- Restrict your API keys to be usable only for certain forms & scopes: Select what forms and what scopes your API Key has access to. Doing that will limit the level of access that this API Key has. Note: A scope just defines what actions an API call is allowed to make, it does not grant access to any data for the selected users, or all users if ‘All domain users’ is selected for the Type. The normal user access security applies to all API calls. This means that if the ‘Record Create’ scope is enabled, if the user that is calling the API doesn’t have rights to create records (‘Who can Create New Records’ on the form’s Settings tab), the API will return a 401 unauthorized error.
- Regenerate your API keys periodically: You can regenerate API keys from the API Key list page by clicking `Generate new key` for each key. Then, update your applications to use the newly-generated keys. This way, even if an API key is found by unwanted users it will become invalid after a period because a new key was generated.
- Enable / Disable API Keys: You can disable your API key at any time, that will disable any call trying to use that API Key.
- Delete unneeded API keys: To minimize your exposure to attack, delete any API keys that you no longer need.
Additional API Settings
This article reflects in-app API options. Additional options for API Keys can be found within the API section of the Platform Settings.
