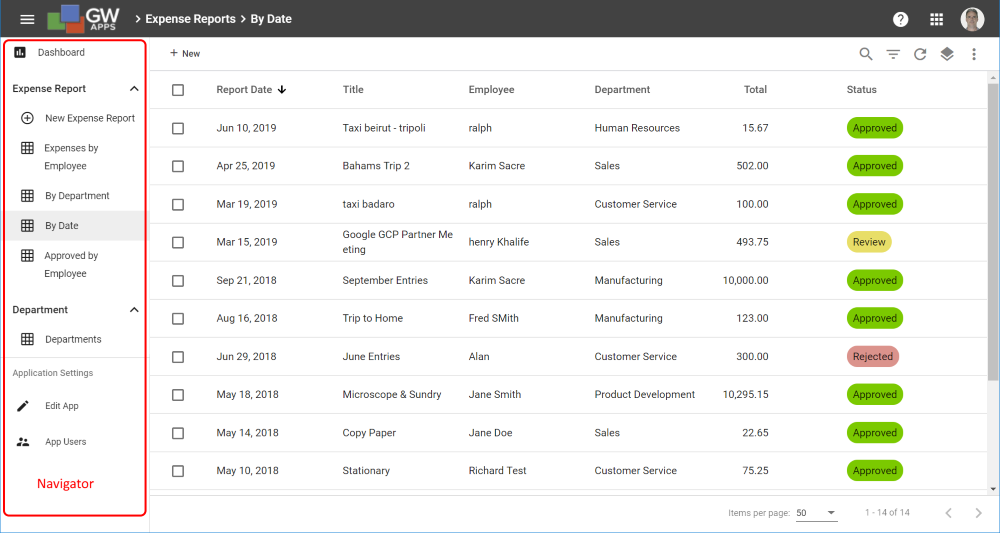
As there can be many view and forms within an app, the user will need a way to pick what they would like to see or do, that is the function of Navigation. It displays as a vertical menu of options on the left side of the app. The use can then simply click on the option they need.
| Example of Navigation: An Expense Reports App |
 |
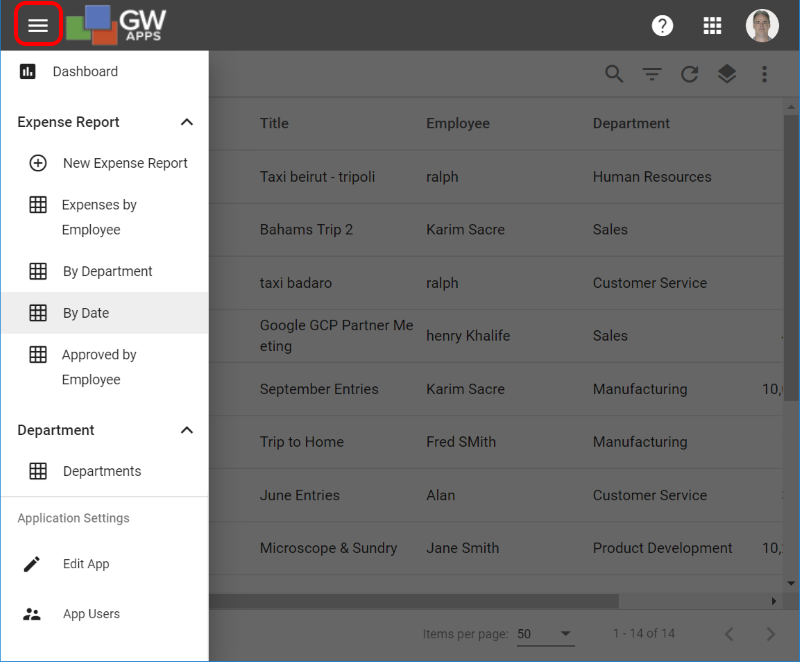
If the user is on a smartphone or simply has the apps displayed in a small browser window, the Navigation will automatically hide itself to leave more room for working with the app. Clicking on the three bar menu icon in the top left corner will display the Navigation.
| Example of Navigation on a Small Screen |
 |
Editing Navigation
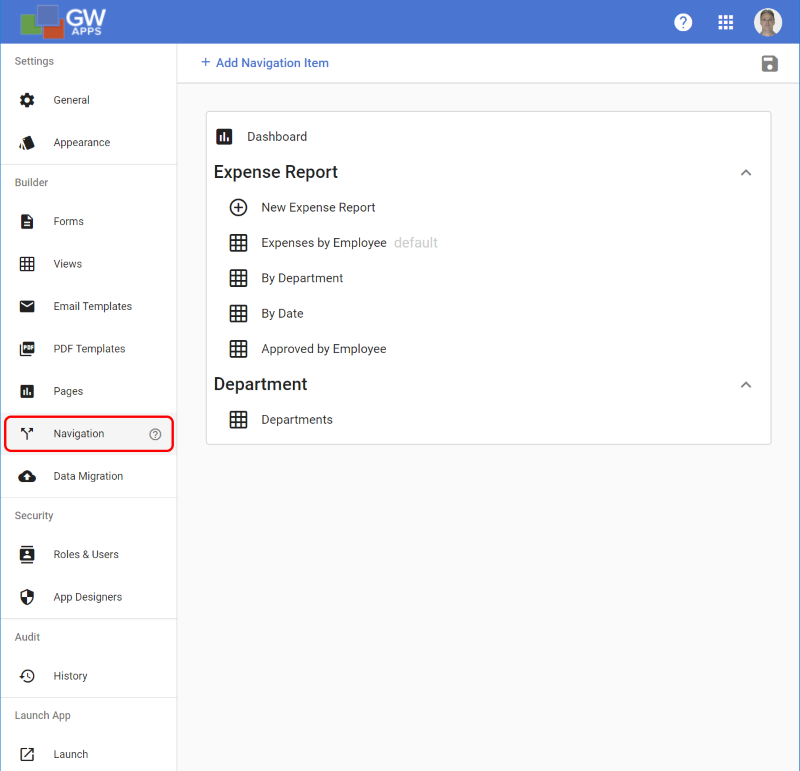
An App Designer can access Navigation, where they can define what displays in the left side menu, by clicking on the Navigation button from the left side design navigator.
![]()
| Navigation Editor |
 |
Navigation Editor
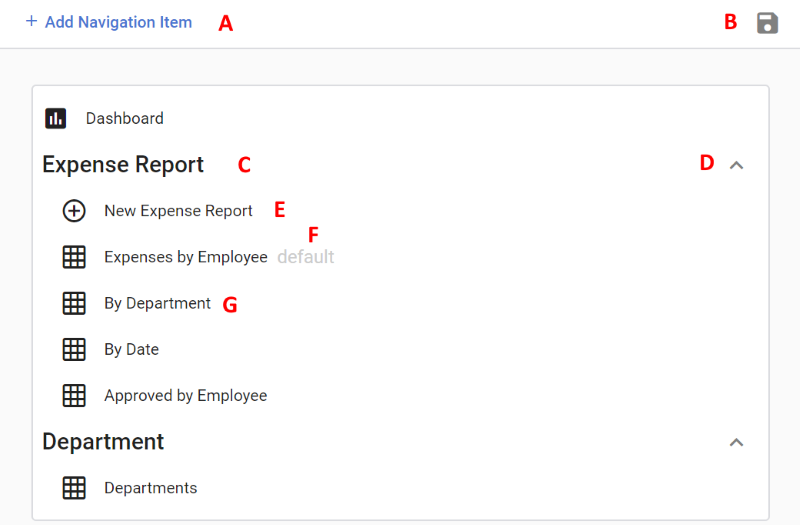
To create a new item to the navigator, click on the + Add Navigation Item button on the action bar at the top of the screen. You will be presented with the Create Form dialog:
| New Form Dialog |
 |
| Item | Description |
| A – Clicking on this button will display the Add Navigation Item dialog shown below, and allow the user to add a new navigation element. | |
| B – Save – Clicking on this will save the current navigation settings. If you leave the navigation without saving your updates, they will be lost. | |
| Section Header | C – A section header allows you to group related items together. Often this is done to group views and the create new record buttons that are related to the same form. (In the example above, Expense Report is a form in the application.) |
| Section Expand/Collapse | D – The up/down arrow controls allow you to expand and collapse a section. These only work when using the application and not in design mode. |
| Form Entry | E – This kind of entry will create a new record from the named form. (In the example above, it would create a new Expense Report record.) |
| Default Entry | F – The default entry is the one that will be selected, and hence displayed, each time any user opens the application. (In the example above, the user would see the Expenses by Employee view in the main area to the right of the navigation each time they open the Expense Reports application.) |
| View Entry | G – This kind of entry will open the related view when clicked on. (In the example above, the user would then see the By Department view in the main area to the right of the navigation.) |
New Navigation Item
Clicking on the + Add Navigation Item button on the action bar at the top of the screen will display the following dialog:
| New Navigation Item Dialog |
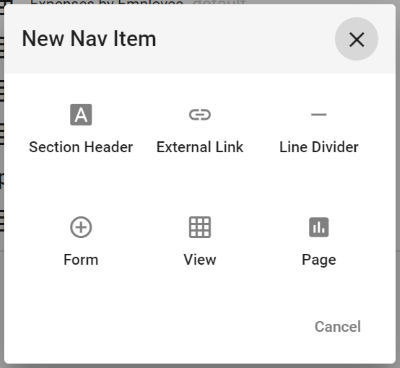 |
| Item | Description |
| Section Header | Adds a Section Header to allow the navigation to be logically grouped by form type or other category. |
| External Link | Adds an item that will allow users to click and be redirected to any valid URL, just like any normal web link. |
| Line Divider | Adds a horizontal ruled line, to visually separate items in the navigator. Use it to help to organize the navigation. |
| Form | Adds an item that will compose a new record with the selected form. |
| View | Adds an item that open the selected view. |
| Page | Adds an item that open the selected page. |
Editing Existing Items
When you hover your mouse cursor over a Navigator entry, you will see a menu of options at the right side of the Navigator. The options you will see depends on the type of navigator entry and where it is positioned in the Navigator:
| Section Header Options |
| Other Item Options |
| Last Item in a Section Options |
| Item Immediately Below a Section Options |
| Item | Description |
| Show Details: Clicking on this icon will open the right-side Information panel, where item properties can be view and edited. | |
| Remove: Clicking on this icon will remove the associated navigation item from the navigator. If you remove a form, page or view it will not delete the actual form, page or view, just remove it from the navigation. | |
| Default: Clicking on this icon will select it and make this navigation item the default one that is displayed to users when they first open the app. | |
| Remove Item from Section: Clicking on this icon will move the item out of the section. It will stay immediately below the section, and will now align left, instead of being indented, as it is no longer in the section. | |
| Move Item Into Section: Clicking on this icon will move the item into the section. It will stay in the same place vertically, but will be indented to the right (to indicate it is part of the section). |
Next Steps
| Below is the link to the navigation part of the Task Management App tutorial series: |
| Part 7: Building a Task Management App – Dashboard, Navigation, and Updating the App |