The View Editor is the right place to start building your view, as it is the only place to create a new view, add and remove columns, and to set security. However, if you want to adjust column widths, sorting, set the alternate row colors or similar, the View Editor won’t show you how the changes will look. You have to close the View Editor and go and look at the updated view.
The best way to tweak the look and sorting of a Table view is to make the changes directly in the view itself. You can see the results of the changes immediately, and if you’re happy with the results you can save the changes to the view design, making them permanent.
In View Editor: What You can Change
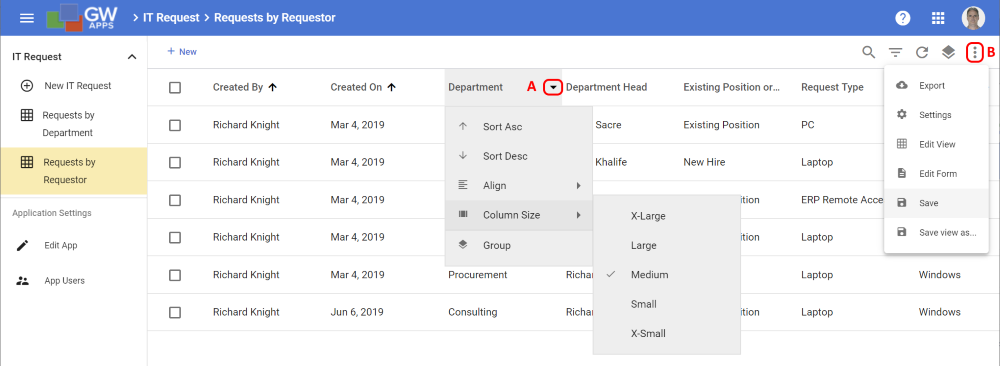
The screen-shot below shows the two ways you can make design changes while looking at the view.
| In View Editing: What you can change |
 |
| Item | Description |
| View Columns (A) | |
| Sort Asc | Sort the records in this view by the values in this column in ascending order: A > Z. (Sorting is done from left to right, so if there are any sorted columns to the left of this column, the records will be sorted by those criteria first, and then the setting in this column.) |
| Sort Desc | Sort the records in this view by the values in this column in descending order: Z > A. (Sorting is done from left to right, so if there are any sorted columns to the left of this column, the records will be sorted by those criteria first, and then the setting in this column.) |
| Align | The way the values align within this column: Select ‘Left’, ‘Center’ or ‘Right’. |
| Column Size | Controls the displayed width of the column in the view. Select from five options from ‘XSmall’ to ‘XLarge’. All columns default to the middle option of ‘Medium’. |
| Group | Add grouping to the selected column. Once grouping has been enabled, an option for the grouping settings will appear on the menu. See the section ‘In View Editing: Grouping Options’ below for more details. (Grouping, like sorting, is done from left to right, so if there are any grouped columns to the left of this column, the records will be grouped by those columns first, and then this column.) |
| View Settings (B) | |
| Export | Export all the data in the view to a local csv file. (This is not a view editing option.) |
| Settings | Displays the Settings tab from the view design in a right-hand properties panel, so that you can change settings such as the view name, display of the preview pane, or alternate row colors. |
| Edit View | Opens the traditional View Editor screen for the current view, so that you can access additional options such as filtering and security. (If you have made an changes to the design that you would like to keep, remember to ‘Save’ before clicking on ‘Edit View’. or the changes will be lost.) |
| Edit Form | Opens the Form Editor for the form associated with this view. |
| Save | Saves the current changes to the view design so that they become how everybody will now see the view. |
| Save view as… | Allows you to save the current view design as a new view with a different name. The current view will not have the changes saved to it. (Works just like “Save as” in a word-processor.) |
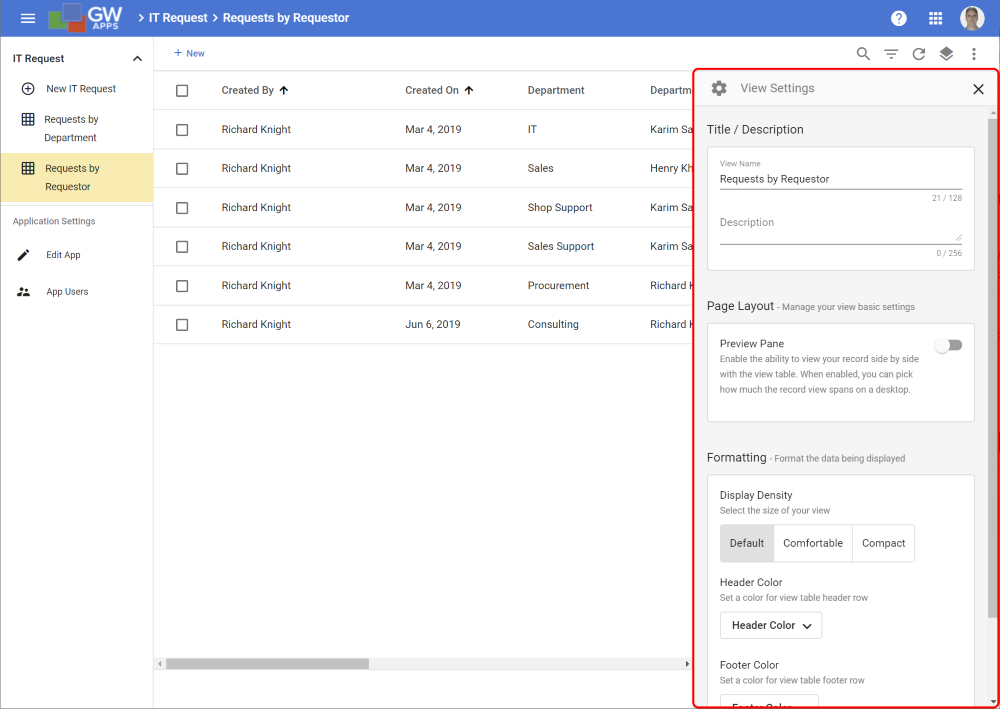
In View Editing: Settings Panel
These are options for the view as a whole rather than specific columns. For details of the available options, see the article View Editor: Common Settings, and scroll down to the ‘Settings Tab’ section.
| In View Editing: Settings Panel |
 |
In View Editing: Grouping Options
Once grouping has been enabled, the menu option ‘Group Options’ will appear.
| In View Editing: Group Options |
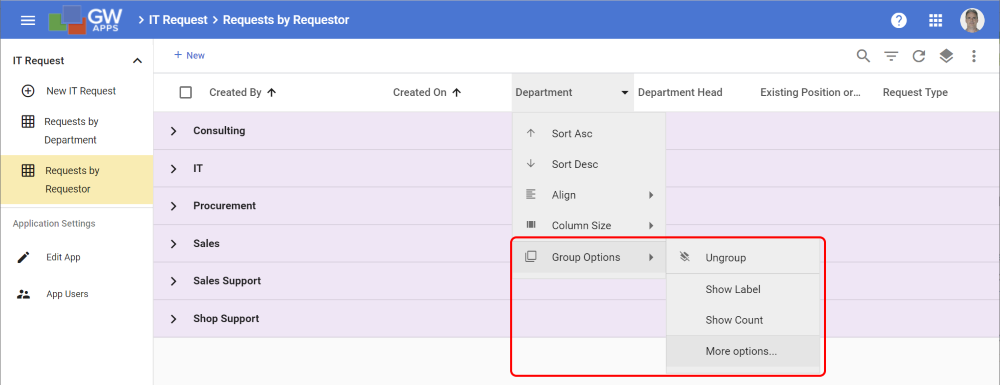 |
| Item | Description |
| Ungroup | Removed grouping for this column. |
| Show Label | Show the field name for this column directly above the value for each grouping. (As you usually group by values your users would immediately recognize, such as department, state or year, the ‘Show Label’ option isn’t usually needed.) |
| Show Count | Display the number of records in each grouping or sub-grouping. |
| More Options… | Opens a dialog box that allows you access to all of the grouping options, including group sort order and display color. See below for details. |
More Options…
| In View Editing: Group Options > More Options… |
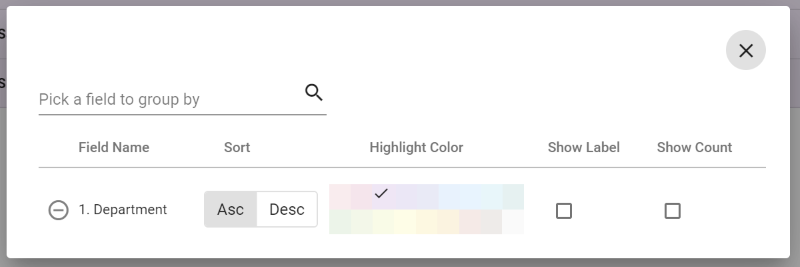 |
This dialog shows you exactly the same as you would see in the Grouping section of the Filters tab in the View Editor. (See the ‘Default View Grouping’ section of the article View Editor: Common Settings for a detailed explanation of the options.)
| Field | Description |
| Pick a field to group by | To add a column grouping to the view, click in this field and select the desired field from the list. |
| Field Name | Group the view by the selected field. |
| Sort | Sort that view column grouping in ascending or descending order. |
| Highlight Color | Select the color used for the grouping highlight bar. |
| Show Label | Show the field name for this column directly above the value for each grouping. (As you usually group by values your users would immediately recognize, such as department, state or year, the ‘Show Label’ option isn’t usually needed.) |
| Show Count | Display the number of records in each grouping or sub-grouping. |
| Click to remove that grouping. |