Data Migration allows you to import existing data into a GW Apps application. The source could be an existing spreadsheet, or an export from another application on GW Apps or any other platform. If the data can be saved as a CSV (comma separated value) text file, it can be imported into a GW Apps application.
To access the data migration feature you need to be an App Editor, as the option is on the Edit App left-side navigation. Select ‘Edit App’ from ‘Application Settings’ on the apps left-side navigation. (If you do not see the ‘Application Settings’ option then you are not an App Editor for the current app, and will not currently be able to use the data migration feature.) Then select Data Migration from the left-side navigation, as shown below:
| Data Migration Dashboard – No migrations completed yet |
Once you have completed one or more data imports, they will be listed on the Data Migration dashboard, as shown below:
| Data Migration Dashboard – Migrations completed and listed |
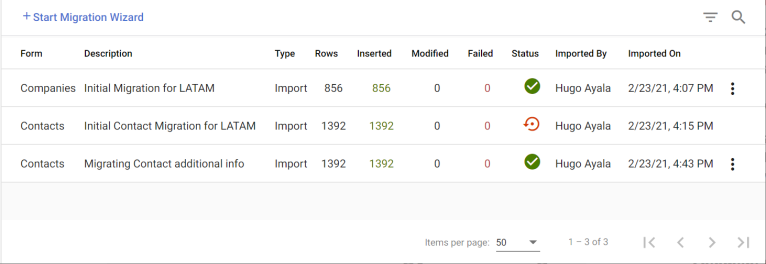 |
| Item | Description |
| Form | The name of the form the import used. |
| Description | The description text supplied when the migration was created or the file name if no description was provided. |
| Type | – Import: Addition of new records. – Update: Update of existing records, though new records can also be created. – Create: An Import where the process also created the initial form and view as part of the migration. |
| Rows | How many rows were found in the CSV file. |
| Inserted | How many new records were created. |
| Modified | The number of records successfully updated. The number shows all app records matched with rows in the CSV file, and not just records where actual data values were updated. |
| Failed | The number of rows from the CSV file that were not successfully handled in the data migration. |
| Shows that the import was completed successfully. | |
| Shows that the import was initially completed successfully, it was then reverted, so in effect, this import never happened. | |
| Menu: Click on this icon to access the Revert option. Reverting an import undoes all of the updates and additions from the import, so in effect, this import never happened. (Note: It is always simple to revert an import soon after it was completed, you must be more careful reverting an import after additional imports or user activity as you may be removing or changing records users or other imports have also modified.) |
There are three options for how the CSV file data is imported into the app:
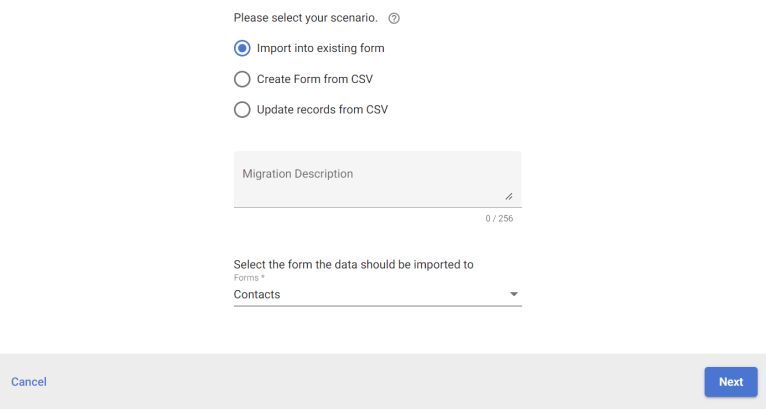
- Import into existing form – The data will be uploaded as records of the form you select. The form must already exist in the current app.
- Create Form from CSV – The Data Migration tool can create a new form for you, based on the data it finds in the imported CSV file. The first row column headers, if any are present, become the default field names and field types are estimated based on the data. All such settings can be manually adjusted
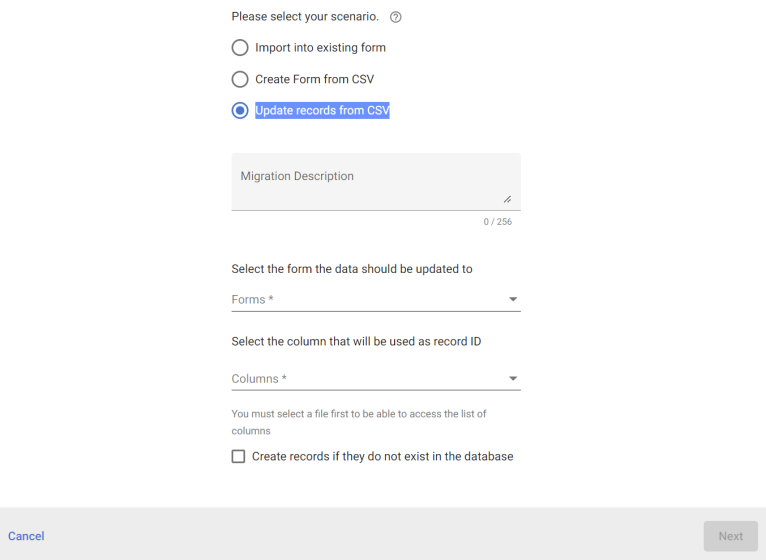
- Update records from CSV – The data will be read and existing records will be updated with any modified or new data values. The form must already exist in the current app, and the CSV file must contain Record ID values to allow record matching. New records can also be created.
Data Migration Process
To start a new data import, click on the ‘Start Migration Wizard’ button. The Data Migration wizard is a four step process:
- Select Scenario – Select the CSV file, import option, and other basic settings.
- Field Mapping – Map the data in the CSV file to the fields on the form, so that the data is imported inti the right places.
- Data Conversion – Verify and mitigate any data type issues.
- Import Results – See a report on the import results and links for next steps.
Details for each step are outlined below:
1. Select Scenario
The first screen of the Data Migration wizard allows you to select the CSV file to import and enter basic details about the.
| Select Scenario Initial Look |
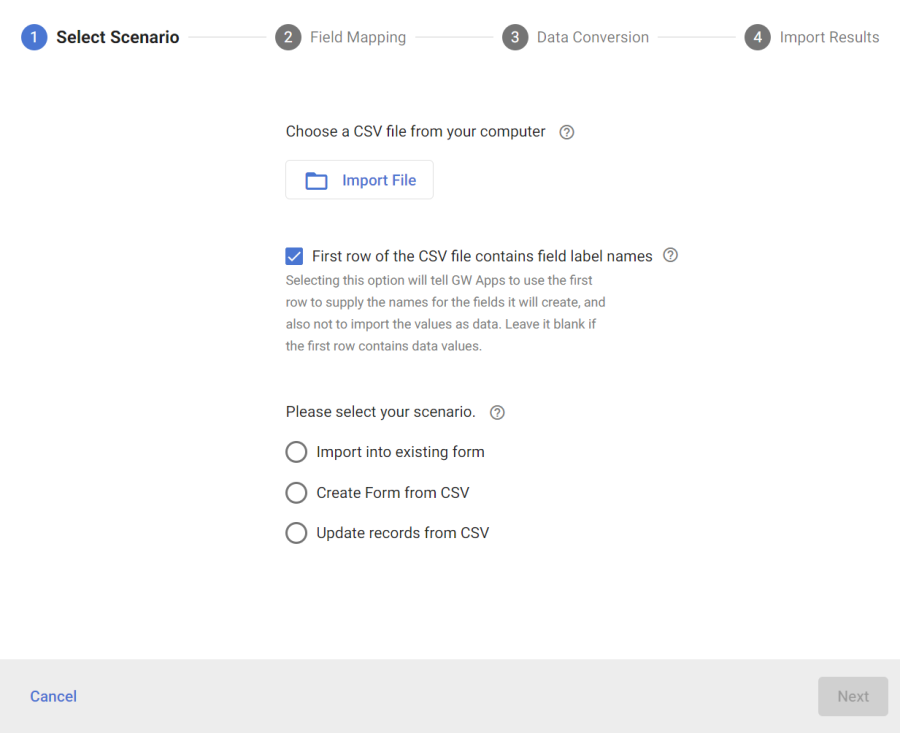 |
| Item | Description |
| Import File | Click on this icon to select the required CSV file. The file selection dialog will be set to only show CSV files, as these are the only files GW Apps can import. |
| First row of the CSV file contains field label names | This option will be checked by default. If the first line/row of the CSV file contains labels that describe the contents of that ‘column’, then leave it selected. If the CSV file has data values in the first line/rom, then deselect this option, or that first row of data will not be imported. |
| Please select your scenario | Select one of the three import options: – Import into existing form – Create Form from CSV – Update records from CSV Once you select a scenario, additional fields appear. These are detailed below: |
| Import into existing form – Additional Fields |
 |
| Item | Description |
| Migration Description | [Optional] Add a brief description of the purpose or data of this import. It will display in the list on the Data Migration Dashboard. The imported filename will display in the list if no description is supplied. |
| Select the form the data should be imported to | The field will show a list of all of the forms in the current application. Select the form the imported data records should be associated with. |
 | Click on Next to move to the next step in the data migration wizard. The button is greyed out and not clickable until all required fields are filled. |
| Click on Cancel to cancel the data migration wizard. |
| Create Form from CSV – Additional Fields |
 |
| Item | Description |
| Migration Description | [Optional] Add a brief description of the purpose or data of this import. It will display in the list on the Data Migration Dashboard. The imported filename will display in the list if no description is supplied. |
| Form Name | Type the name for the form that will be created by importing the selected CSV file. |
| Form Description | [Optional] Add a brief description of the new form, if desired. |
| Which role(s) will be able to create new records with this form | The field will show a list of all of the access roles in the current application. All of them will be selected by default. Deselect/Select the roles you want to be able to create new records using the form that is created. |
| Click on Next to move to the next step in the data migration wizard. The button is greyed out and not clickable until all required fields are filled. |
| Click on Cancel to cancel the data migration wizard. |
| Update records from CSV – Additional Fields |
 |
| Item | Description |
| Migration Description | [Optional] Add a brief description of the purpose or data of this import. It will display in the list on the Data Migration Dashboard. The imported filename will display in the list if no description is supplied. |
| Select the form the data should be updated to | The field will show a list of all of the forms in the current application. Select the form the imported data records should be associated with. |
| Select the column that will be used as record ID | The field will show a list of all of the columns in the current CSV file. Select the column that contains the GW Apps ‘Record ID’ for rows that define existing records that need updating. Rows that define new records, that don’t already exist in this application, will not have a value in this column. See (XYZ) for more details on the ‘Record ID’ and updating records via data migration. |
| Create records if they do not exist in the database | Select this option if you want rows in the CSV file that have no ‘Record ID’ value to be added into the app as new records. If this option is left blank, only valid updates will be made and no new records will be created. |
| Click on Next to move to the next step in the data migration wizard. The button is greyed out and not clickable until all required fields are filled. |
| Click on Cancel to cancel the data migration wizard. |
2. Field Mapping
Once the Anonymous Access setting is enabled at the platform level, each for within every application within your domain will now display it’s own Anonymous Access setting. They will all be initially set to disabled, but you can now enable anonymous access for any form you want.
| Field Mapping |
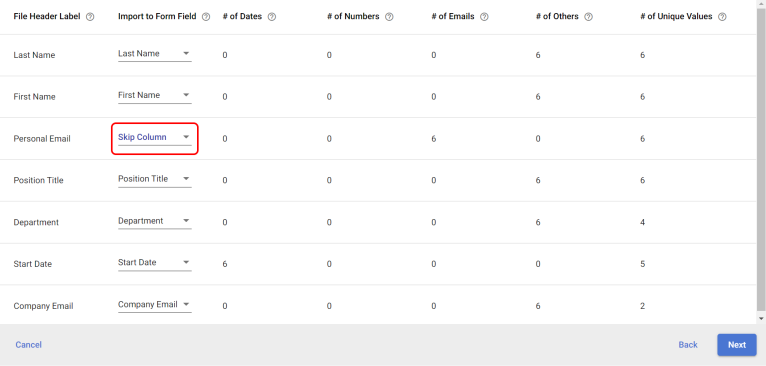 |
| Item | Description |
| Field Header Label | The name for this column/field as defined in the header row of the CSV file. If there were no column headers in the first row if the CSV file, the data from the first row will display, which will still help with field mapping. |
| Import to Form Field | The field will show a list of all of the fields in the current form. If the field header label matches a field name, then that field will be selected. If there is not matching field name, then ‘Skip Column’ will be displayed to show it did not find a match, see example ringer in red above. You can then selected the required field, if one exists, or leave it as ‘Skip Column’ and that data will not be imported. |
| # of Dates # of Numbers # of Emails # of Others | The total number or rows in the CSV that has data that appears to be of the date / number / email / other type. This allows you to see if the data in the CSV file as as you expect and if it will likely import correctly. |
| # of Unique Values | Select this option if you want rows in the CSV file that have no ‘Record ID’ value to be added into the app as new records. If this option is left blank, only valid updates will be made and no new records will be created. |
| Click on Next to move to the next step in the data migration wizard. The button is greyed out and not clickable until all required fields are filled. |
| Click on Back to move to the previous step in the data migration wizard. | |
| Click on Cancel to cancel the data migration wizard. |
| Field Mapping – Create From from CSV Additional Columns |
 |
| Item | Description |
| New Field Name | The name for the field on the new form where data from this column should be saved. It will default to the name defined in the header row of the CSV file. You can edit the name as required. |
| New Field Type | The data type for the field on the new form where data from this column should be saved. It will default to the data type the wizard found when it read all of the data in that column. You can select a different data type as required. Depending on the data found in that column, not all data type options will display for each field, as the wizard will try to prevent data type mappings it know will cause errors. |
3. Data Conversion
| Data Conversion |
 |
| Item | Description |
| Field Name | The name of the field on the form. |
| Field Type | The data type of the field, eg: Text, email, number, date. |
| # records where data doesn’t match Field Type | The number of values from the relevant column in the CSV file that do not match the Field Type of the field; e.g. “Next Tuesday” in a date field or “a lot” in a number field. |
| Replace those data conflicts with | For rows that don’t match the Field Type (Date, Number, etc), we can’t import the actual value that is in the CSV file because it is incompatible, so what value should be imported. The value entered will be used for all the records identified as having the wrong data type for this field. You will only be able to enter a value if there are records with data issues for this field (prior # records column isn’t 0). Examples of some data conflict options are outlined in the table below: |
| Click on Start Data Migration to move to import the data into the app and move the the final step in the data migration wizard. | |
| Click on Back to move to the previous step in the data migration wizard. | |
| Click on Cancel to cancel the data migration wizard. |
| Data Conflict Option | Description of Resolution |
| For list type fields (radio button, checkbox, list selection, etc.). If the column contains an option not defined in the field’s Options list, it will be added to the field design. | |
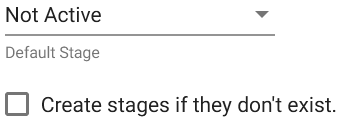 | For the Status field that stores the records current workflow stage. Define a stage to assign to records where a value is not supplied in the CSV file. A Status is always required for any record. The ‘Create stages …’ option will perform similar to the ‘Create options …’ above, but it will create new workflow stages for the form based on the new values in the CSV file. |
 | For List Selection fields. Allows the import to update the field’s design to allow for multiple selected values. The selection field underneath allows for additional field values to be picked that will be added to all imported records in this field, in addition to the specific values for that record in the CSV file. |
4. Import Results
| Import Results |
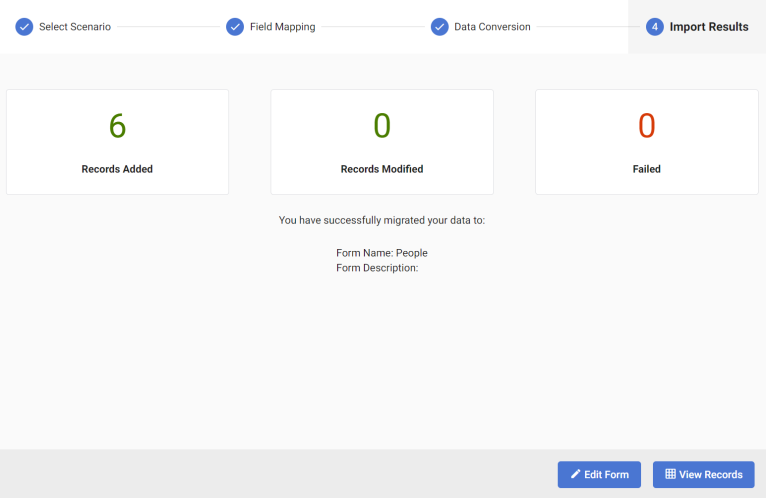 |
| Item | Description |
| Records Added | The number of records successfully added to the app. |
| Records Modified | The number of records successfully updated. The number shows all app records matched with rows in the CSV file, and not just records where actual data values were updated. |
| Failed | The number of rows from the CSV file that were not successfully handled in the data migration. |
| Click on Edit Form to be taken to the form editor for this form. This is a useful option if you have just used the Data Migration wizard to create a form, as it will undoubtedly need some updates to complete it’s design. | |
| Click on View Records to be taken to the default view for this form, so you can review the imported data. (Note: Depending on the design of that view, the imported data might not actually display in that view and another view might then need to be selected.) |
Creating CSV Files for Successful Updates
If you are going to use the Update records from CSV option, there is a specific requirement for the CSV file to be used. The CSV file must include a column that includes the Record ID of the records to be updated. This Record ID must be the one generated by GW Apps. The easiest way to achieve this is to create an export view in the app that has all of the fields you will need. Include in the view a column for the ‘Record Id’ system field. You can then export all the records from this view, and each will have the correct Record ID value. You can then make whatever data updates you need and you will be able to safely use the Data Migration wizard to import the updates.
You do not need to keep all of the rows or columns in the CSV file. You only need to include the rows for records you want to update or add, and only the columns which contain meaningful data.