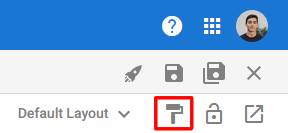
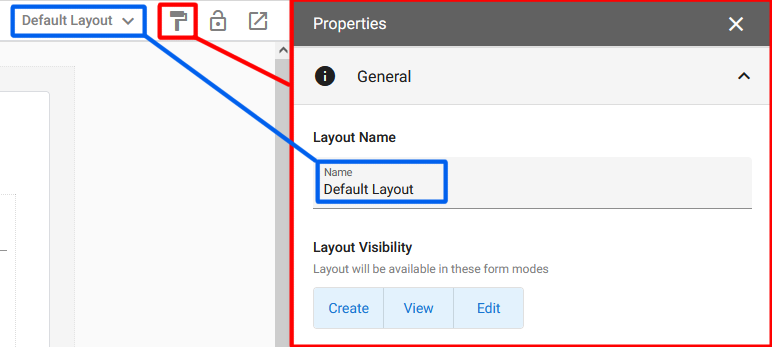
You can create and edit multiple different form layouts, give your form a step-by-step or tabbed layout, and change the appearance of your forms and fields using the Form Layout & Appearance options. To access these options, open the Form Editor (Design tab) and select the paint roller icon in the top right corner.
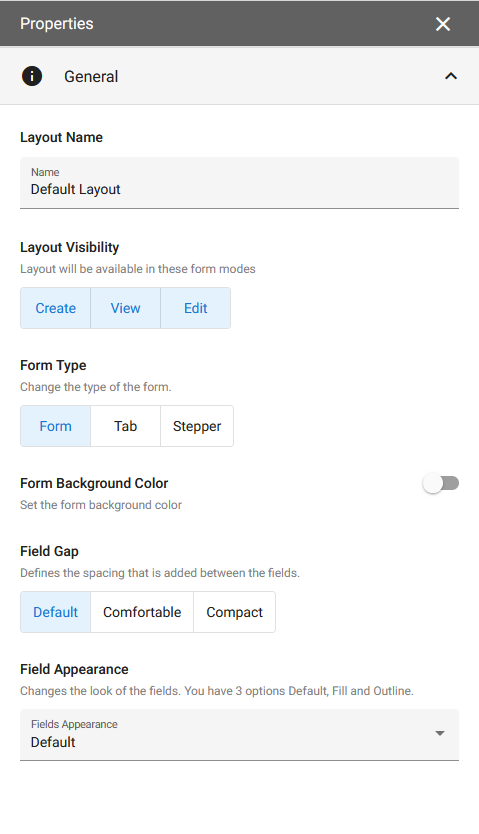
Layout Properties: General
You can create multiple layouts for your form, and each can have a unique set of appearance settings. (Learn more about creating multiple layouts below.)
| Property | Description |
| Layout Name | Set the name for this layout. Try to make it descriptive of what the layout is for or how it is different from other layouts, but also keep it a short as is practical. |
| Layout Visibility | Defines which form modes this layout will be visible in: Create, View, Edit. This allows you to have a different form layout used in View mode than in Edit mode, or when the record is first created (Create mode). |
| Form Type | Select either: Form is a standard, single page form. Tab allows you to break your form down into separate pages which a user can move easily between by clicking on the tab for each page. Stepper gives your form a step-by-step or wizard usage style with multiple pages that the user moves between in a fixed linear order. If a page on he form has required fields, users can only move to the next page after successfully completing the current page. |
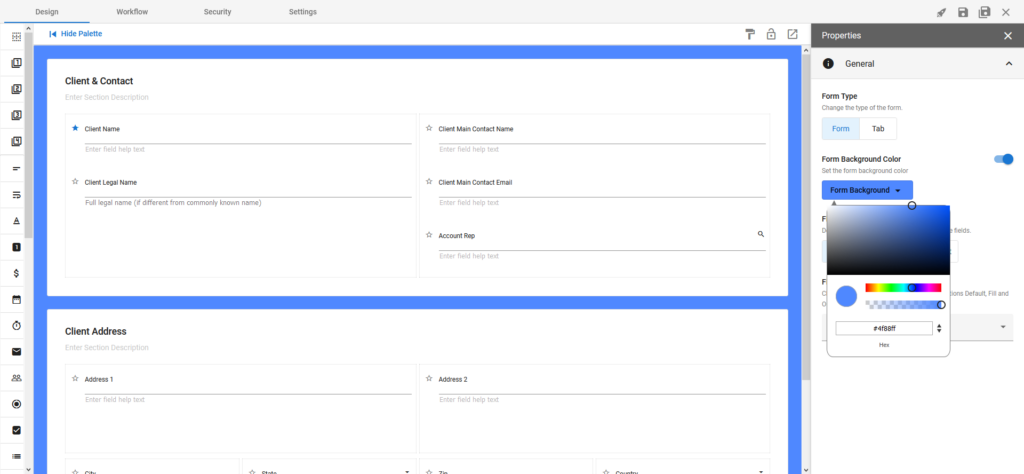
| Form Background Color | Changes the color of the outer rim of the form and the space between sections. |
| Field Gap | Allows setting the space between fields on your form (the padding). Default has the largest amount of space, then Comfortable, and Compact is the smallest. |
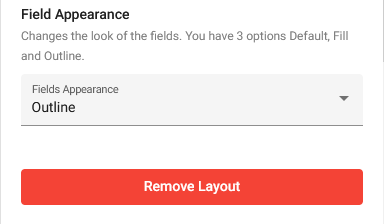
| Field Appearance | Sets how all of the individual fields will look. There are three options: Defsault, Fill and Outline. |
Default | Fill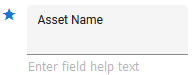 | Outline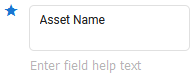 |
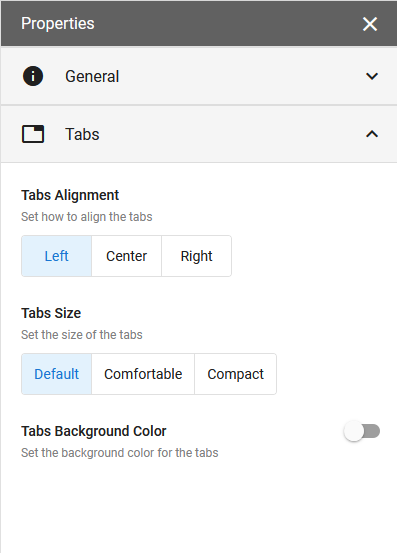
Form Type: Tab
After selecting the ‘Tab‘ form type, a new section of properties will appear in the Layout Properties panel, beneath the General properties. These properties control the appearance of the tab bar (alignment, size, and color).
Create & Edit Tabs
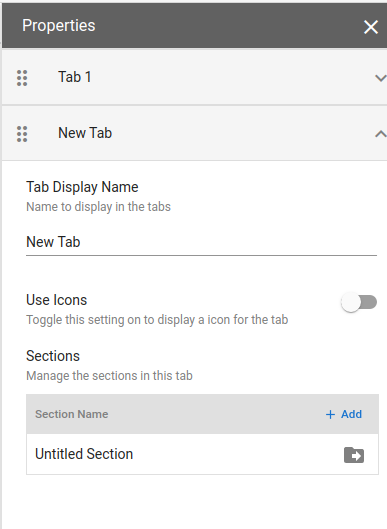
After selecting the ‘Tab‘ form type, you will also see ‘Tab 1’ appear at the top of the form. To edit this tab and create additional tabs, select the ‘Tab Properties‘ icon at the right-hand end of the tab area at the top of the form, and the Tab Properties panel will appear.

Here you can rename tabs, choose tab icons, move sections between tabs, and create new tabs.
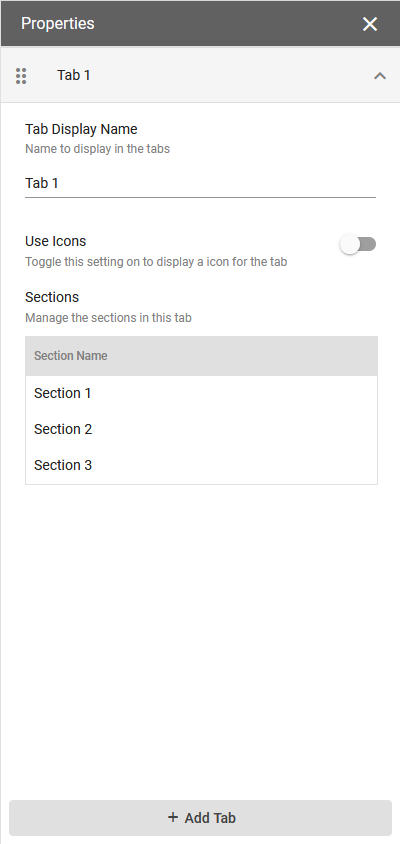
To create a new tab, click the ‘+ Add Tab‘ button at the bottom of the properties panel. When you add a tab, a new untitled section will automatically be created within that tab.
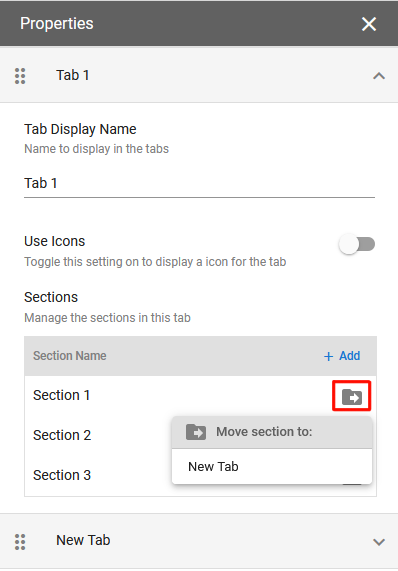
Manage Tab Sections
To move a section to a different tab, simply click the ‘move folder’ icon next to the right of the section and choose which tab to move it to.
Alternatively, you can press the ‘+ Add‘ button to add a section to the currently selected tab and remove it from it’s original tab. (Sections can only appear on a single tab in a layout.)

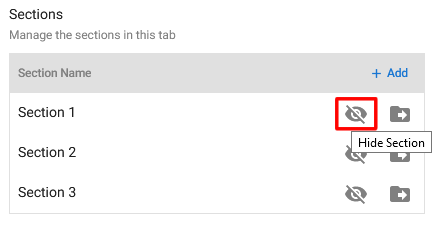
You may also Hide sections completely using the Eye Icon. After hiding a section, the section can be added back to the desired tab using the ‘+ Add‘ button.
Rearrange and Delete Tabs
You can rearrange your tabs by clicking and dragging the six-dots icon to the left of the tab’s name in the Tab Properties panel.
And you can delete a tab by hovering your mouse cursor over the tab in the Tab Properties panel and selecting the trashcan icon. If the tab has any sections, you will be asked if you want to delete the sections or transfer them to a different tab.
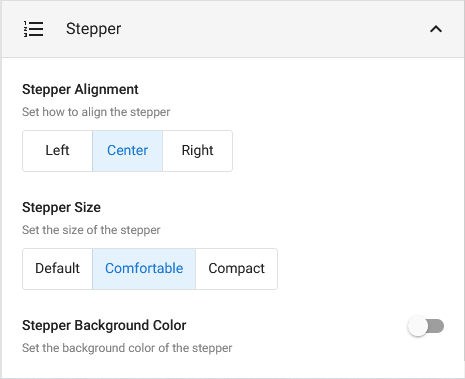
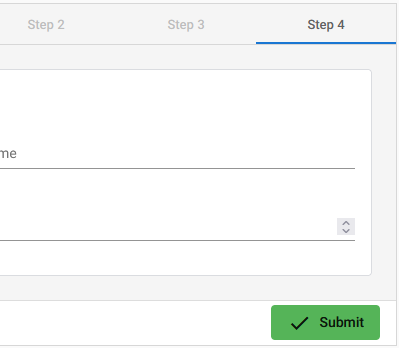
Form Type: Stepper
After selecting the ‘Stepper‘ form type, a new section of properties will appear in the Layout Properties panel, beneath the General properties. These properties are identical to the Tab properties, and allow you to control the appearance of the stepper bar (alignment, size, and color).
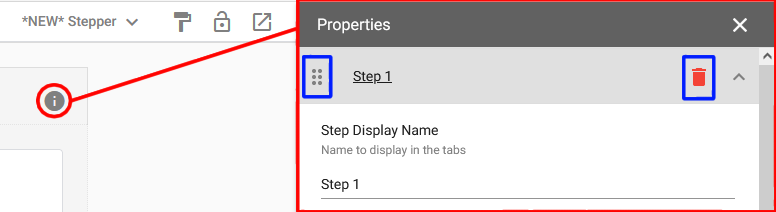
Create & Edit Steps
Just like the Tab layout, after selecting the Stepper option you will see ‘Step 1’ appear at the top of your form. To create and edit steps, select the properties icon on the right side of the bar.
To add a step select the ‘+ Add Step‘ button on the bottom of the properties panel. When you add a step, a new untitled section will be added to the step automatically.
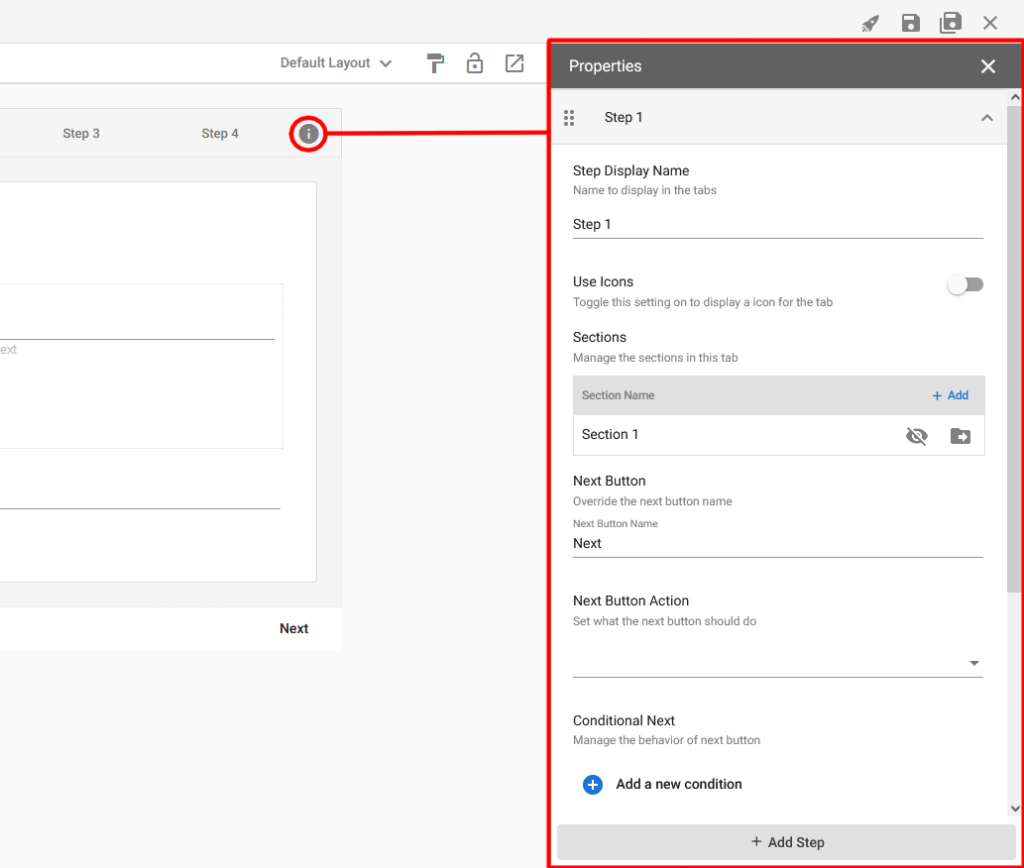
Here you can change the Step Display Name (what users will see) and choose whether or not to Use Icons for the current step.
Sections on your form can be moved between steps and/or hidden in the exact same way as for Tabs (See Manage Tab Sections).
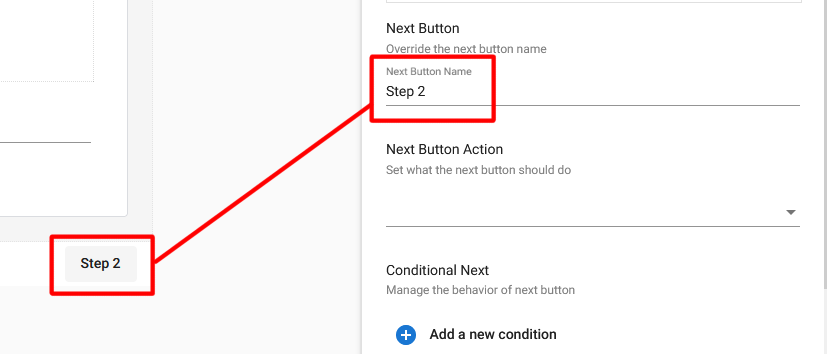
The Next Button and Previous Button names can be edited for each step (default “Next” and “Previous”).
The Next Button Action gives you a choice of the next step to show when the next button is selected:
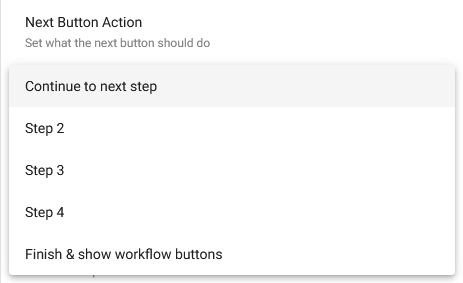
- Continue to next step will move the user one step forward (determined by the Step order).
- Move to a specific step. Note: if you use this option to jump over a step (for example, move from Step 1 to Step 3), the Previous button will return you to Step 1, and not move you to Step 2.
- Finish & show workflow buttons will replace the ‘Next’ button with the workflow action buttons for the workflow stage the record is in, and hence end the stepper.
Manage Stepper Sections
The process for managing Stepper sections is identical to that discussed for the Tab sections. (See: Manage Tab Sections.)
Rearrange and Delete Steps
Rearranging and deleting Steps works the exact same way as it did for Tabs. However, after rearranging steps make sure to double check your Next button configurations. (See: Rearrange and Delete Tabs.)
Multiple Layouts
You can create multiple layouts for your forms, each with their own specific settings, and switch between them while creating, editing, or viewing a record.
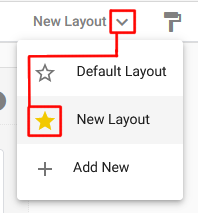
To add a new layout, select the layout drop-down list and click ‘+ Add New‘.
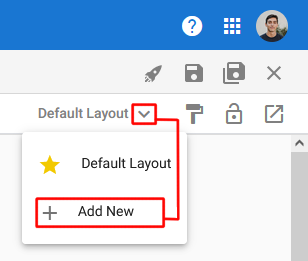
This drop-down is also used to switch between layouts in the Form Editor.
After adding a new layout, the Form Layout & Appearance properties will open again. You can then change the name and settings for the new layout.
Layout Visibility allows you to control which layouts are available on which form modes. For example, you may wish to use a Stepper layout on ‘Create’, and a Form layout when viewing/editing the record so you can see all the data on one page.
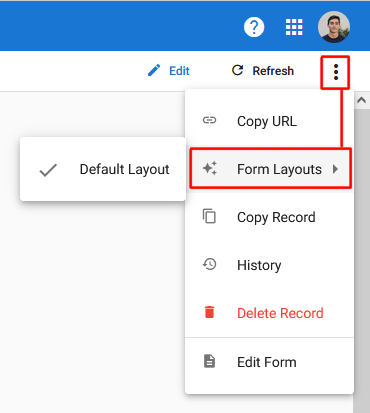
When creating, viewing or editing a record, you can switch between layouts using the three dots icon in the top right corner of the record page.
Primary Layout
The Primary Layout is the one which will display when you open a record, assuming it is set to display in the mode you are currently in: Create, view or edit. You can change which layout is the Primary Layout, by selecting the star next to the layout in the drop-down list. This option does not override your Layout Visibility settings.
Remove Layout
To remove a layout, switch to the layout you wish to remove, open the Layout Properties panel, and click on the ‘Remove Layout’ button at the bottom of the General properties section. The ‘Remove Layout’ button will not display if you have selected the Primary Layout. To delete the Primary Layout, you will need to first make a different layout the Primary, and then you will be able to delete the ‘old primary’.
Additional Layout Options
The form Settings tab contains an option for the overall form layout width, as well an option to add a Form Outline, like a table of contents that shows jus the sections of the form nd allows the user to jump quickly between sections. Note that these are general layout settings, and will display for each layout of the form. (Note: When using an Outline with Tab or Stepper layouts, the outline only shows the sections on the current tab or step.)