Triggers are one of the two ways that Actions can be made to run, the other being Workflow Action Buttons. Triggers are a way to automatically take one or more Action(s) related to specific records in an application. The Trigger says when it happens, the Actions say what happens.
For example, in a help desk application you could create a trigger to run every weeknight at 7pm to send an email every service request that has been created more than 2 das ago but is not yet resolved. The emails could go to the assigned service tech’s manager, or the service manager for unassigned request. That way, service requests that are not being dealt with in a timely manner will escalate themselves to the appropriate manager.
An App Designer can create, edit and delete Triggers from the Triggers Dashboard. To access the Triggers Dashboard:
| Edit App > Triggers |
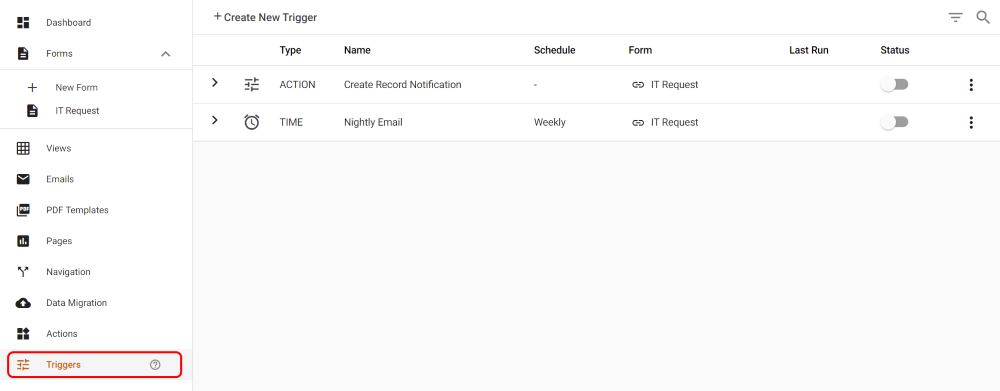 |
Triggers Dashboard
The Triggers Dashboard shows all available triggers for the current application, displayed as a list. An App Designer can create and update them from here. Each trigger has it’s own row menu (three vertical dots on the far right side) which lets you work with the trigger.
| Triggers Dashboard |
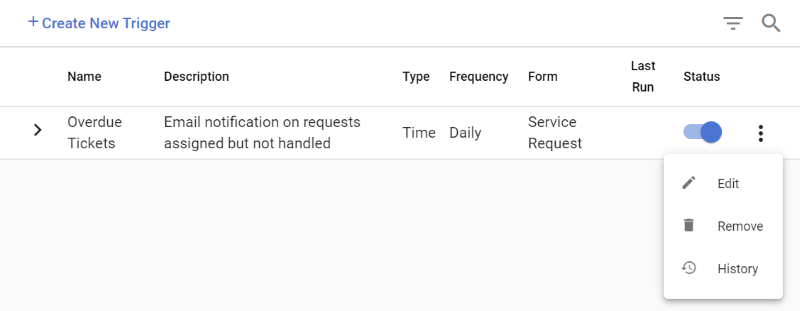 |
Each trigger row has the following options:
| Item | Description |
| Status | A toggle to enable and disable the trigger. Enabled triggers will be evaluated and run at the appropriate time, while disabled ones are inactive. |
| Edit | Opens the trigger to be edited. (See Creating a new Trigger, below, for details of the Trigger Form.) |
| Remove | Deletes the trigger from the application. |
| History | Displays the edit and run history for the trigger. |
Creating a New Trigger
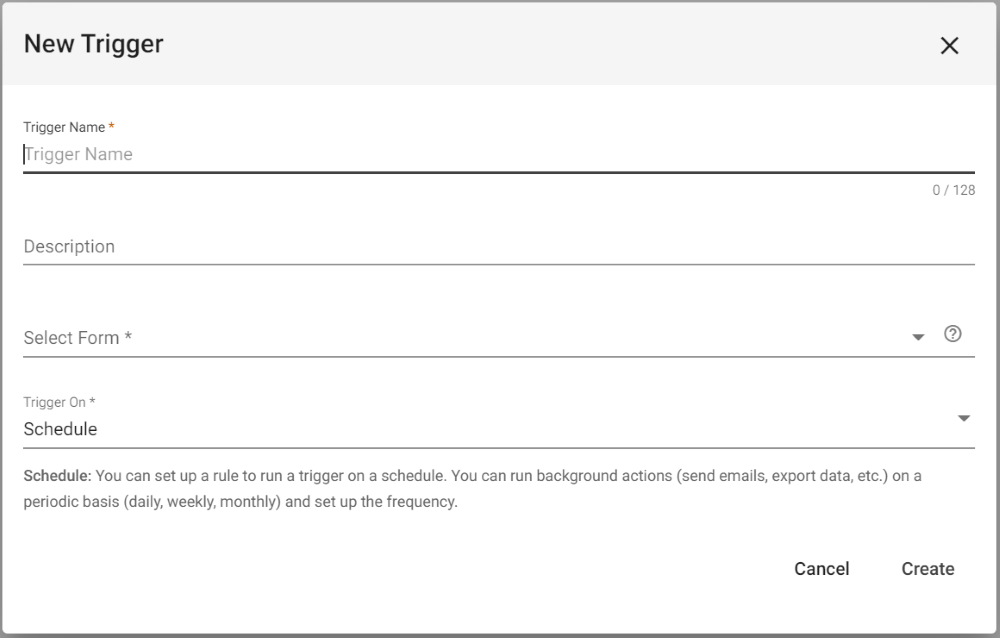
To create a new trigger, click on the + Create New Trigger button at the top of the dashboard. You will then be presented with the Trigger Form:
| New Trigger Dialog Box |
 |
An App Designer can create, edit and delete Triggers from the Triggers Dashboard. To access the Triggers Dashboard:
| Item | Description |
| Trigger Name | Enter the name of the new trigger. |
| Description | If desired, enter a description for the trigger to help clarify its purpose. [Optional] |
| Select Form | Select the form whose records you would like the trigger to act on. |
| Trigger On |
Select the way you would like the trigger to happen. The options are:
|
| Cancel | Cancels the creation of the new Trigger. |
| Create | Creates the new Trigger and opens the trigger editor so you can see the configuration for a final review or additional updates. The trigger has already been created and saved. |
We will now describe the specific configuration options and details for each of the Trigger On options.
Action Trigger Options
| Trigger Editor: Action Trigger |
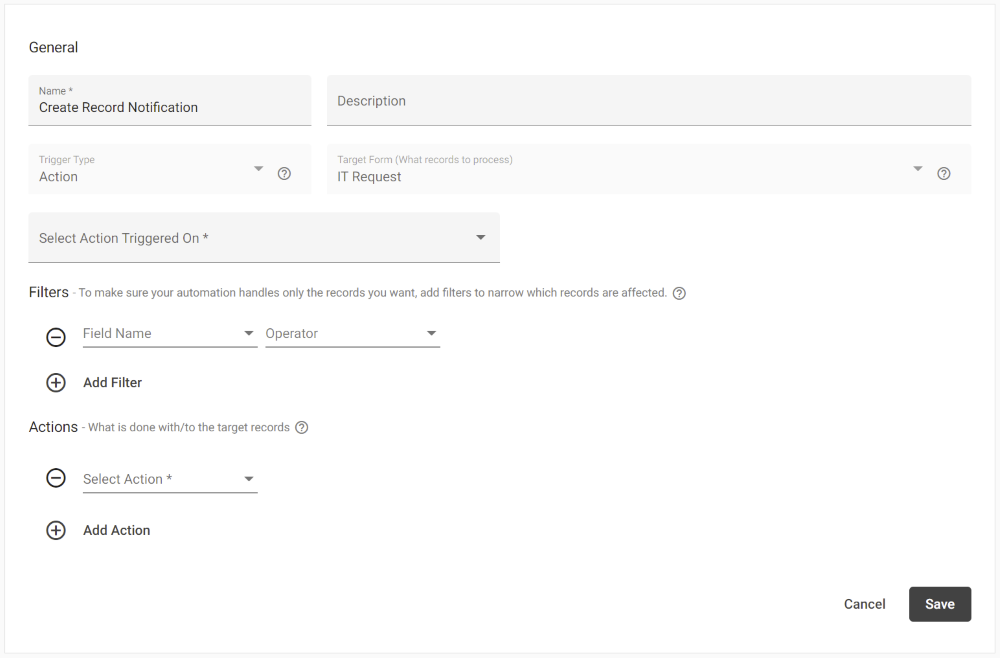 |
| Item | Description |
| Name | The name of the trigger. |
| Description | [Optional] Enter a more detailed description for the trigger to help clarify its purpose, if desired. |
| Trigger Type | [Read Only] The type of Trigger – In this case ‘Action’. This was set in the ‘New Trigger’ dialog box. |
| Target Form | [Read Only] Form for which the trigger will be applied. This was set in the ‘New Trigger’ dialog box. |
| Select Action triggered on |
Selects the action event that will cause the trigger to execute. Options are:
|
| Filters | See Setting Filters later in this article for details. |
| Actions | |
| Select Action | Select the type of Action and then the specific Action of that type to execute. |
| Click to add more actions to be run when the trigger executes. You can add as many Actions as you need. | |
Scheduled Trigger Options
| Trigger Editor: Scheduled Trigger |
 |
| Item | Description |
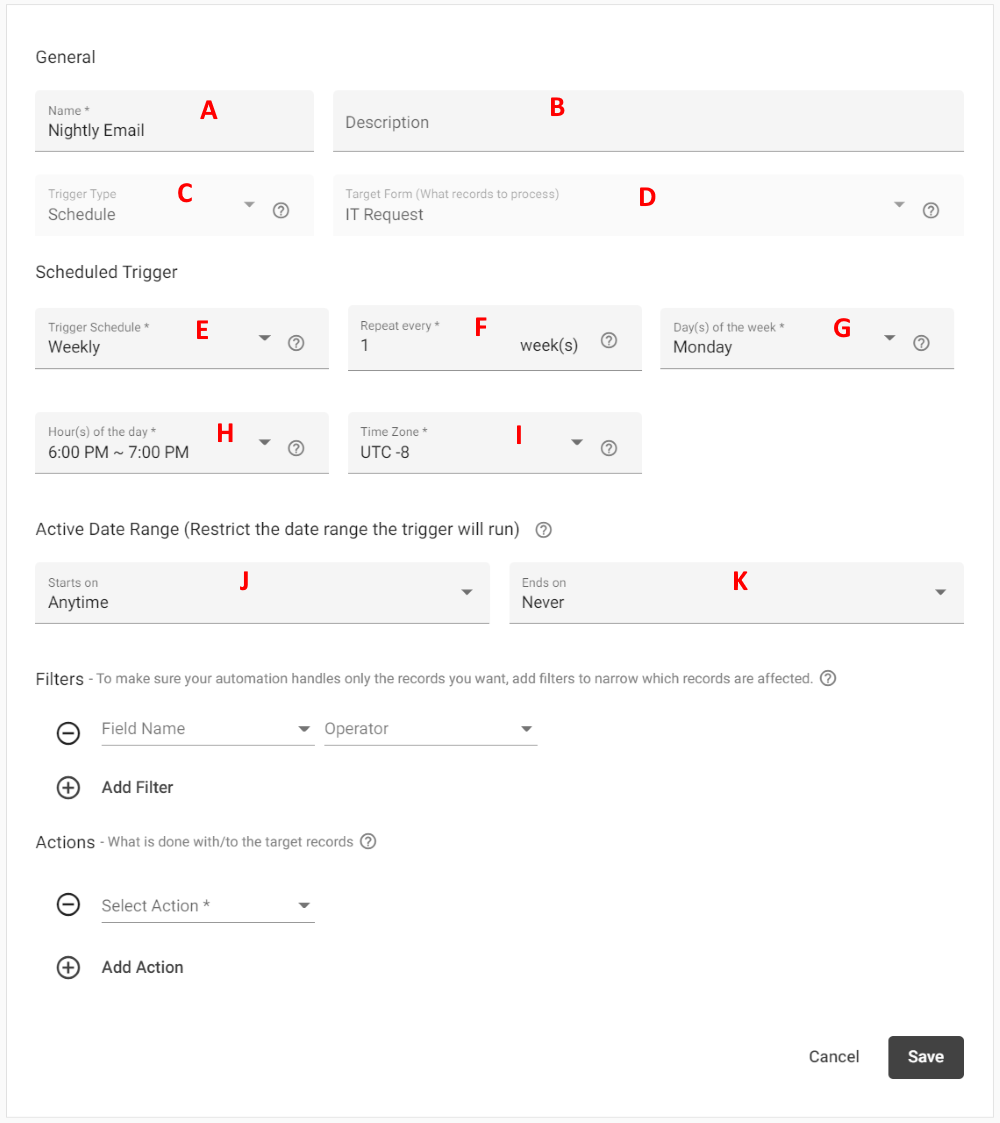
| Name (A) | The name of the trigger. |
| Description (B) | [Optional] Enter a more detailed description for the trigger to help clarify its purpose, if desired. |
| Trigger Type (C) | [Read Only] The type of Trigger – In this case ‘Schedule’. This was set in the ‘New Trigger’ dialog box. |
| Target Form (D) | [Read Only] Form for which the trigger will be applied. This was set in the ‘New Trigger’ dialog box |
| Trigger Schedule (E) | Does this action repeat in a way that is best described in terms of days, months or years? For example: if it should run every 3 days then select ‘Daily’, if it should run every other month on the 3rd then select ‘Monthly’, and if it should run on the 1st day of January, June and December then select ‘Yearly’. |
| Repeat Every (F) | How many days, months or years should the action wait in between each time it is triggered. If you wanted to have it run every day, you would have to select ‘Daily’ for the Trigger Schedule and ‘1’ for this field. If you wanted to have it run every 3 months, you would have to select ‘Monthly’ for the Trigger Schedule and ‘3’ for this field. |
| Months of the Year | Which months of the year should the trigger run. Pick as many as required. (Displays for the ‘Yearly’ Trigger Schedule only.) |
| Days of the Week / Days of the Month (G) | Which days of the week/month should the trigger run. Pick as many as required. (Days of the Month displays for the ‘Monthly’ Trigger Schedule, and Days of the Week displays for the ‘Weekly’ Trigger Schedule.) |
| Hour of the Day (H) | What time of day would you like the action to be triggered, or if you want it to run more than once per day, which times. Scheduled triggers can’t be set to run at an exact time of day, so this field shows the hours as time ranges of one hour long, i.e. ‘3pm ~ 4pm’. The action will run at some time within that hour long window. |
| Time Zone (H) | As GW Apps runs on the global Google Cloud Platform, we need to specify which time zone the ‘Hour of the Day’ setting should be in. |
| Starts on (I) | [Optional] Allows you to specify a date before which the trigger will not run. Before that date, it is considered disabled. |
| Ends on (J) | [Optional] Allows you to specify a date after which the trigger will not run. On or after that date, it is considered disabled. |
| Filters | See Setting Filters later in this article for details. |
| Actions | |
| Select Action | Select the type of Action and then the specific Action of that type to execute. |
| Click to add more actions to be run when the trigger executes. You can add as many Actions as you need. |
SLA Trigger Options
| Trigger Editor: Form SLA Trigger |
 |
| Item | Description |
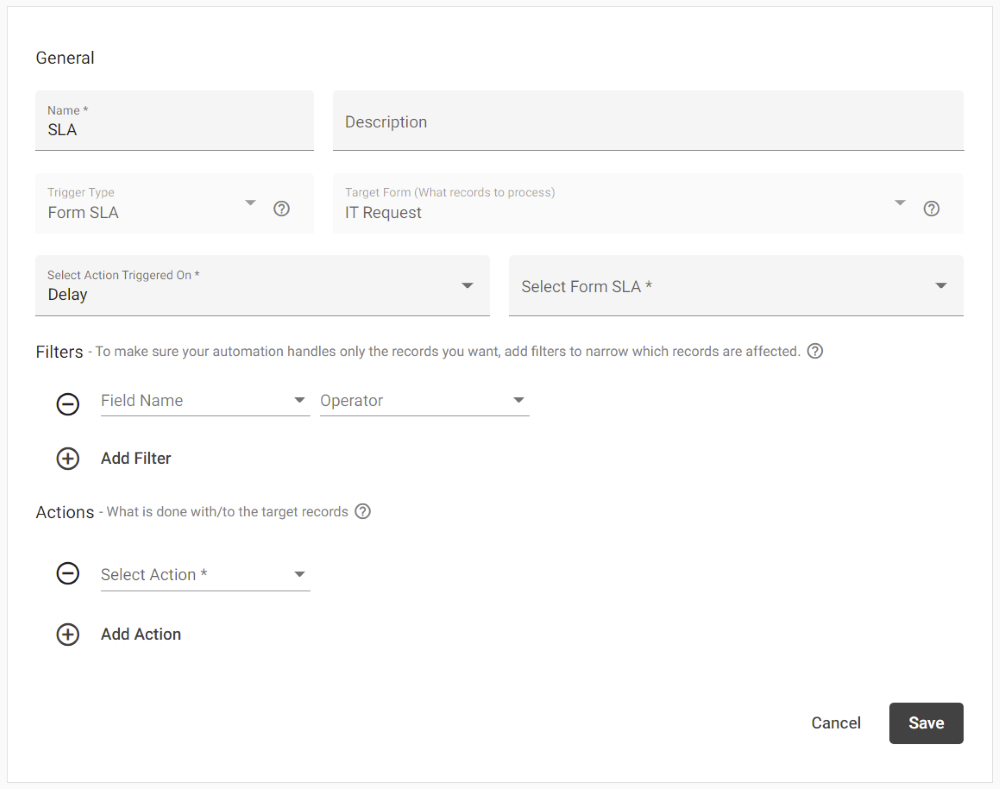
| Name | The name of the trigger. |
| Description | [Optional] Enter a more detailed description for the trigger to help clarify its purpose, if desired. |
| Trigger Type | [Read Only] The type of Trigger – In this case ‘Schedule’. This was set in the ‘New Trigger’ dialog box. |
| Target Form | [Read Only] Form for which the trigger will be applied. This was set in the ‘New Trigger’ dialog box |
| Select Actions Triggered On | Selects the SLA related action event that will cause the trigger to execute. Options are: – Delay – Every time a record exceeds the allowed SLA time at the current workflow stage, if one is defined. |
| Select From SLA | Select the SLA you want to monitor. You can only select a single SLA for each Trigger. |
| Filters | See Setting Filters later in this article for details. |
| Actions | |
| Select Action | Select the type of Action and then the specific Action of that type to execute. |
| Click to add more actions to be run when the trigger executes. You can add as many Actions as you need. |
Setting Filters
Filters in triggers work the same way they do in lookup fields on forms and in view filtering, so if you are familiar with filters there you will know how to set them in triggers.
There are two main steps to adding a filter: Selecting the field on the lookup form to compare with, along with the comparison operator, and then in step 2 you define what you are comparing against.
| Adding a Filter – Step 1 |
 |
| Field | Description |
| Click on this icon to add a new filter. You can have as many concurrent filters as you need. If you add more than one filter, then all filter conditions must be met simultaneously. (They are combined with a logical AND.) | |
| Delete: Click on this icon to delete the associated filter. | |
| Field Name | Select the field on the target form you would like to filter based upon: i.e. Product Name, Department, etc. |
| Operator | Select the desired logical operator for the comparison. The options vary depending on the data type of the field selected in Field. The options are:For Text type fields and pick from list type fields (Radio Button, Checkbox, List Selection, Multi Lookup): equal does not equal blank not blank contains does not contain For Date type fields: before after equals Status fields: equals |
Equals and does not equal require the entire compared value to match/not match: e.g. “Department” does not match “IT Department” when using equals as the whole value is not the same.
Contains and does not contain just searches for the specified text in the comparison value to see if it is there at all. The entire compared value is not required to match: e.g. “Department” does match “IT Department” when using contains.
| Adding a Filter – Step 2 |
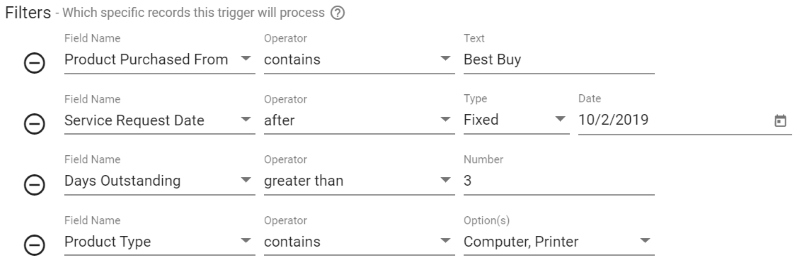 |
| Field | Description |
| Text / Date / Number / Option(s) | Enter the actual value to compare against: e.g. if you were filtering the trigger so it only ran on records where the project area field contained ‘IT’, then simply type ‘IT’ in this field. The type of data entry field you will see will depend on the data type of the field selected in ‘Field Name’. |
Note: There is no ‘Local Field’ option in filtering for triggers.