Actions are exactly what their name suggests, a way to define something you want the application to do. Examples of actions include: Sending an in-app notification, creating a new record or updating an existing record. Actions need to be launched to actually do their work, and this is done using either Workflow Action Buttons or Triggers.
An App Designer can create and edit actions from the Actions Dashboard. To access the Actions Dashboard:
| Edit App > Actions |
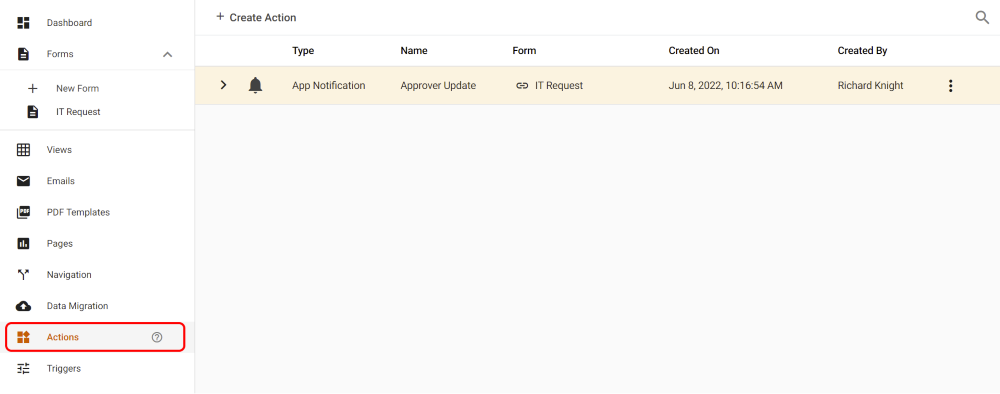 |
Actions Dashboard
The Actions Dashboard shows all available actions for the current application, displayed as a list. An App Designer can create, update and delete actions from here. Each action has it’s own row menu (three vertical dots on the far right side) which lets you work with the action.
| Actions Dashboard |
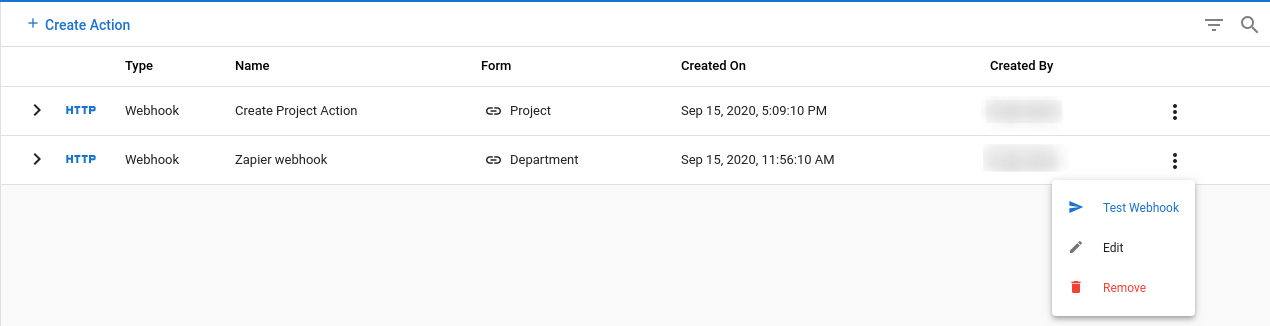 |
Each action row has the following options:
| Item | Description |
| Expand Details – Click on to see summary details of the actions settings. | |
| Action Menu – Click on to see menu options: | |
| Test Webhook | Trigger the webhook now, used for testing the action. (This option only displays for Webhook actions.) |
| Edit | Opens the action so it can be reviewed edited. (See Creating a new Action, below, for details of the Action Form.) |
| Remove | Deletes the action from the application. |
Creating a New Action
To create a new action, click on the + Create New Action button at the top of the dashboard. You will then be presented with the New Action dialog box:
| New Action Dialog |
 |
All actions share the same first three fields, and the Cancel and Create buttons:
| Item | Description |
| Select Action Type | Select the action type, options are: – App Notification – Send an in-app notification. – Assign User to Role – Assign the user names stored in a form field to a dynamic role. – Create Record – Create a new record in the app. – Update Record – Update one or more existing app records. – Webhook – Interact with external systems via webhooks. |
| Action Name | The name of the action. (This name is only seen by App Designers. Try to make it descriptive of the action’s purpose.) |
| Description | [Optional] More detailed description of the action, if needed. |
| Cancel | Cancels the creation of the new action. |
| Create | Creates the new action and opens the action editor so you can see the configuration for a final review. The action has already been created and saved. |
We will now describe the specific configuration options and details for each of the action types.
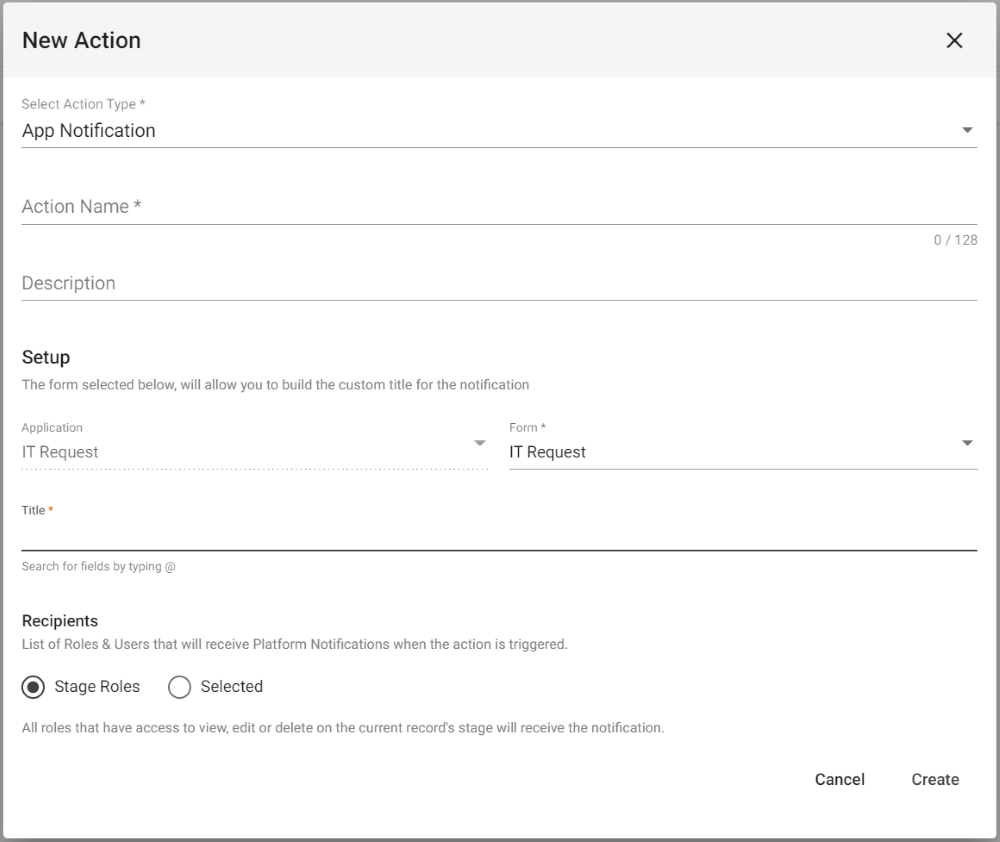
App Notification Options
| App Notification Action |
 |
| Item | Description |
| Setup | |
| Application | Fixed value of the current application. It can’t be changed. |
| Form | Select the form to use with new app notification. Allows values from the form’s fields to be included in the notification text, similar to how field values can be added to the subject or body of an email template. |
| Title | Enter the text for the message. Typing a “@” character brings up a list of fields from the selected form and allows the field’s value to be included in the message. |
| Recipients | |
| Stage Roles | All of the Roles who have access to the record being processed by this action, at it’s current workflow stage, will be sent the notification. |
| Selected | Displays message recipient fields that work exactly the same way as defining recipients for email templates. (See this article for details on defining recipients: Workflow: Email Template Editor.) |
Assign User to Role Options
| Assign User to Role Action |
 |
| Item | Description |
| Setup | |
| Application | Fixed value of the current application. It can’t be changed. |
| Form | Select the form to use. |
| Role to Assign | Select the name of the dynamic role you want to update. |
| Create a new Dynamic Role | Displays ‘Role Name’ and ‘Description’ fields for you to define a new dynamic role to create and use in this action. The new dynamic role is created as soon as you click on ‘Create’ to create this new action. This has the same outcome as creating the new dynamic role first, and then creating the action and selecting its name. |
| Field | The name of the field on the form to get the user name(s). Only user name related fields will display in the list. |
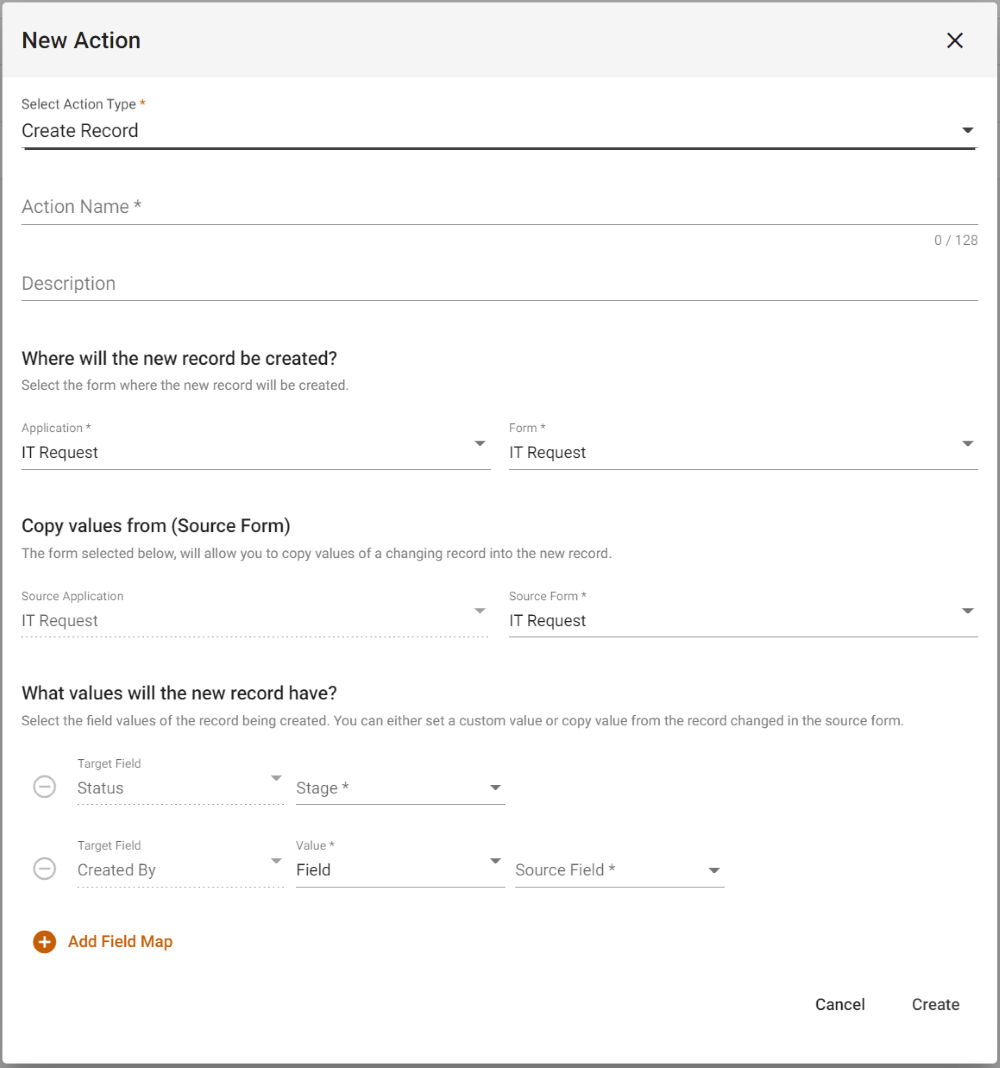
Create Record Options
| Create Record Action |
 |
| Item | Description |
| Where will the new record be created? | |
| Application | Select the application where the new record will be created. |
| Form | Select the form to use for creating the new record. |
| Copy values from (Source Form) | |
| Source Application | Select the source application. |
| Source Form | Select the form containing the fields that will be included in the new record creation. |
| What values will the new record have? | |
| Target Field | The field in the destination form, and hence the new record we are creating, who’s value we want to set. |
| Value | The value to set for the Target Field. Options are ‘Field’ to define a field from the source form to copy the value from or ‘Custom’ to define a specific value. |
| Source Field | The source field or custom value that will be added to the destination field. |
| + Add Field Map | Adds a new Target Field row so you can define an additional field to be set on the new record. You can add as many as you need. |
Update Record Options
| Update Record Action |
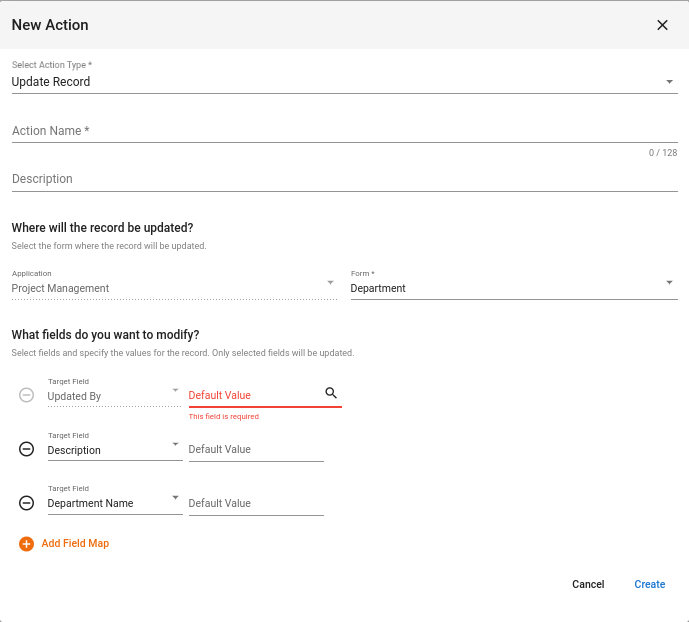 |
| Item | Description |
| Where will the record be updated? | |
| Application | Select the application where the record(s) you want to update resides. |
| Form | Select the form used by the record(s) you want to update. You can only update records from a single form in a specific action. |
| What fields do you want to modify? | |
| Target Field | The field in the destination form, and the target record(s), who’s value we want to set. |
| Default Value | The custom value that the Target Field is going to be set to. |
| + Add field Map | Adds a new Target Field row so you can define an additional field to be set on the new record. You can add as many as you need. |
Webhook Action Options
| Webhook Action |
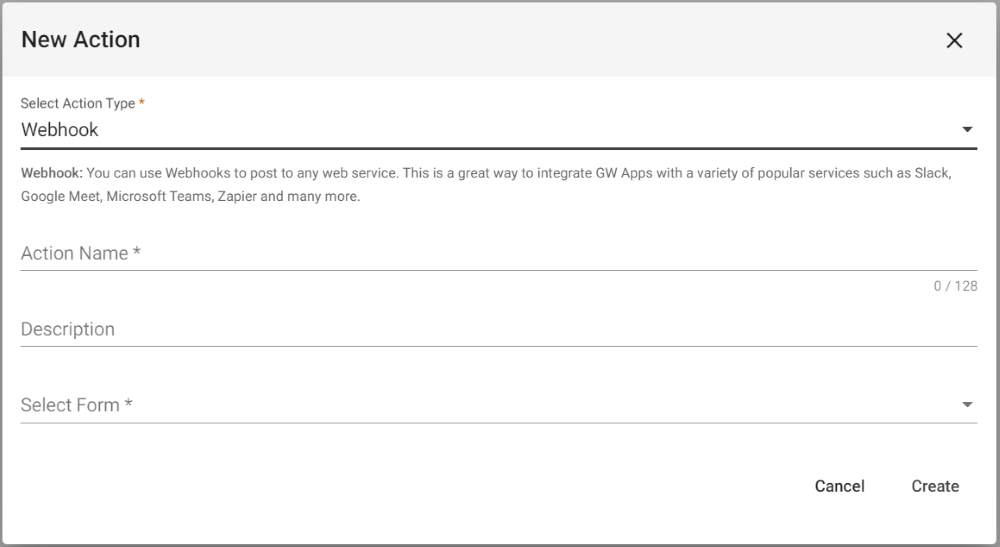 |
| Item | Description |
| Select Form | Select the form that the webhook will receive information from. |
The full configuration of a webhook action is done in the Action Editor, which opens as soon as the ‘Create’ button is clocked.
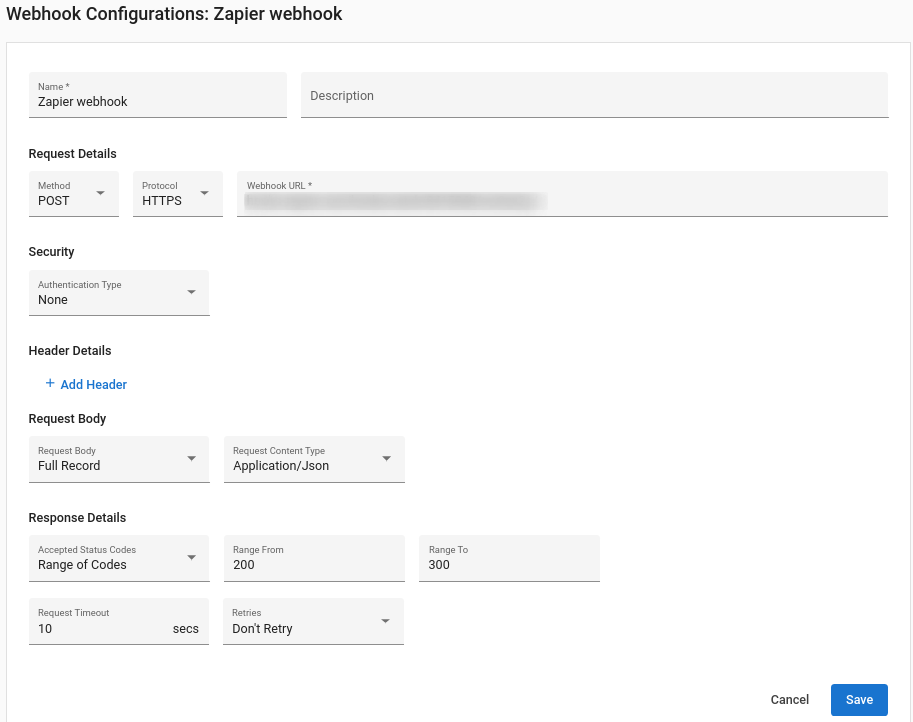
| Action Editor: Webhook Action |
 |
| Item | Description |
| Name | Gvien name of the webhook action. |
| Description | [Optional] Brief description of the action. |
| Request Details | |
| Method | Webhook REST method to execute. |
| Protocol | Protocol supported by the webhook (HTTP or HTTPS). |
| Webhook URL | URL of the webhook that will receive data from GW Apps. |
| Security | |
| Authentication type | If the webhook requires authentication you can pass the required authentication information. Options are: – Basic Auth – Required Username and Password fields display. – Bearer Token – Required Bearer Token field displays. – JWT – Algorithm, Expiration, Secret and JWT Payload fields display. |
| Header Details | You can add header Key-Value pairs supported or required by the webhook. |
| Request Body | |
| Request Body | You can choose what type of Body to include in your request: – Full Record – Data from all fields is sent in the JSON payload. – Partial Record – Displays ‘Select fields to include’ field. Only listed fields will be sent in the JSON payload. – Advanced – Displays ‘Custom JSON Body’ field. Enter the required JSON. |
| Request Content Type | Supported Content Type is Application/Json |
| Response Details | |
| Accepted Status Codes | Select: ‘Single Code’ or ‘Range of Codes’ |
| Status Code | Enter the status code that signifies a successful submission. (Displays if ‘Single Code’ is selected for ‘Accepted Status Codes’) |
| Range From | Enter the lowest numeric value of status code that signifies a successful submission. (Displays if ‘Range of Codes’ is selected for ‘Accepted Status Codes’) |
| Range To | Enter the highest numeric value of status code that signifies a successful submission. (Displays if ‘Range of Codes’ is selected for ‘Accepted Status Codes’) |
| Request Timeout | Maximum time GW Apps will wait for a response code from the webhook recipient. |
| Retries | Should GW Apps retry the webhook submission if the first attempt times out, and if so, how any times. Options are: – Don’t Retry – 1 – 2 – 3 |
Create Word Doc Action Options
| Create Word Doc Action |
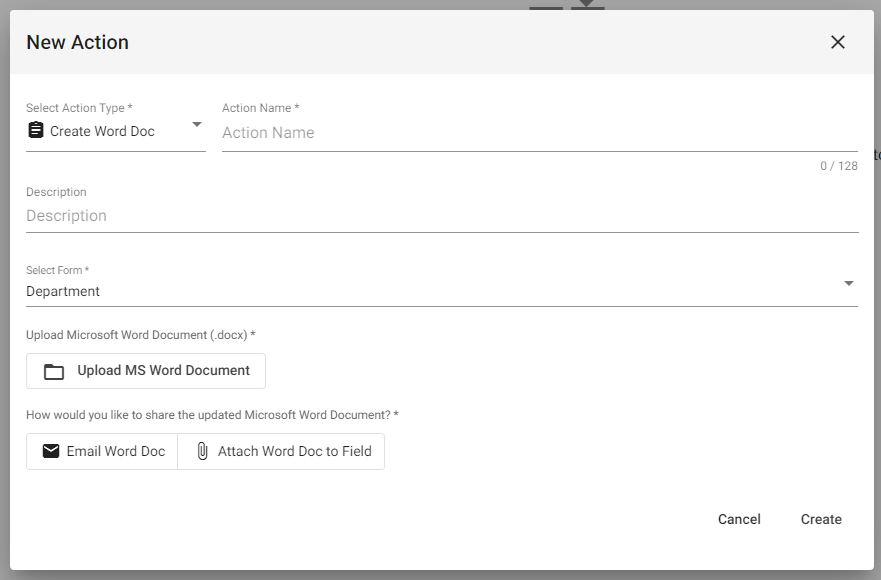 |
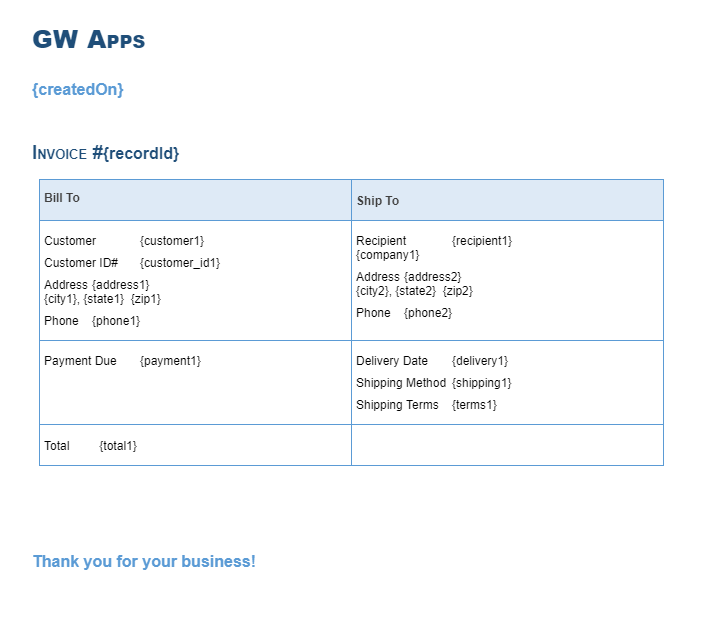
This feature allows you to create a MS Word Doc from a record’s data. The Word Doc layout is first created externally, and then uploaded to GW Apps when creating the action. GW Apps will match the field Short Codes on the Doc with data from the associated fields on a form. The exported document is a Word Doc file (.docx).
How to Use
- Begin by creating and designing the layout of your Word Doc (.docx file) externally in a word processor of your choosing. The file must be saved as a .docx file.
- Add field Short Codes in curly brackets to your Word Doc to designate field data you’d like to capture (see image below). The Short Codes in your Word Doc must match the field Short Codes on the form selected in the Select Form dropdown when creating the action.
- Upload your doc when creating the action using the Upload MS Word Document button.
- Finally, choose whether to attach the doc to:
- An Attachment Field: For this option, you must have an Attachment Field on the selected form. This option will update the record with the Word Doc attached.
- An Email Template: For this option, you must have an existing email template for the selected form. This option will attach the the file to the selected email template as a Word Doc.
Fields not currently supported: Images | Embedded Views | Dynamic Tables
PDF Attachment Action Options
| PDF Attachment Action |
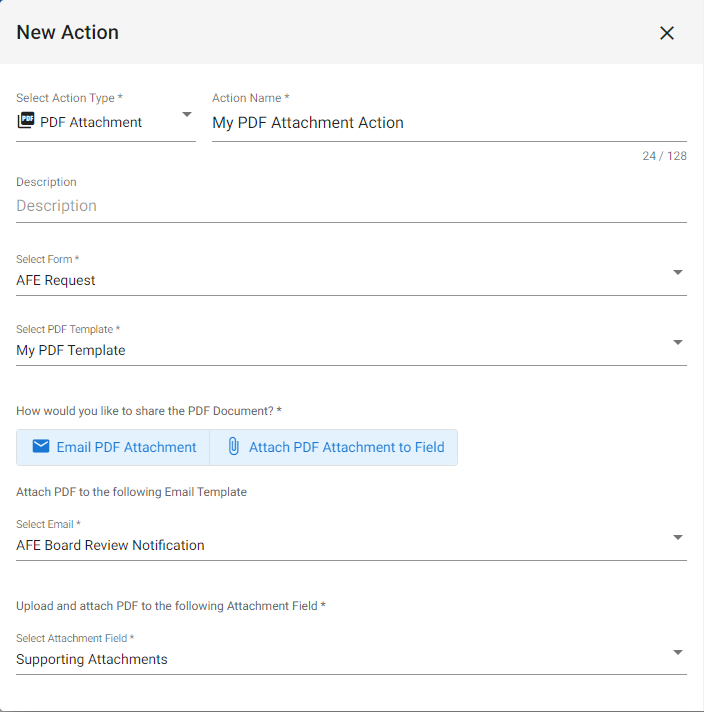 |
This action will automatically generate and attach a PDF Template to an Email and/or an Attachment Field on the selected form. Note that you must first design the PDF Template, and that you must have an Email Template and/or an Attachment field associated with the selected form.
| Item | Description |
| Select Form | Select the form that contains the desired Attachment field and/or Email Template you want to attach the PDF to. |
| Select PDF Template | Select the PDF Template you want to generate and attach. |
| How would you like to share the PDF Document? | |
| Email PDF Attachment | Select this option to attach the PDF to an existing Email Template. After selecting this option, a dropdown menu will appear where you must select the Email Template to attach the file to. |
| Attach PDF Attachment to Field | Select this option to attach the PDF to an existing Attachment Field on the selected form. After selecting this option, a dropdown menu will appear where you must select the Attachment Field to attach the file to. |
Calendar Event Action Options (Google Calendar)
| Calendar Event Action |
 |
 |
 |
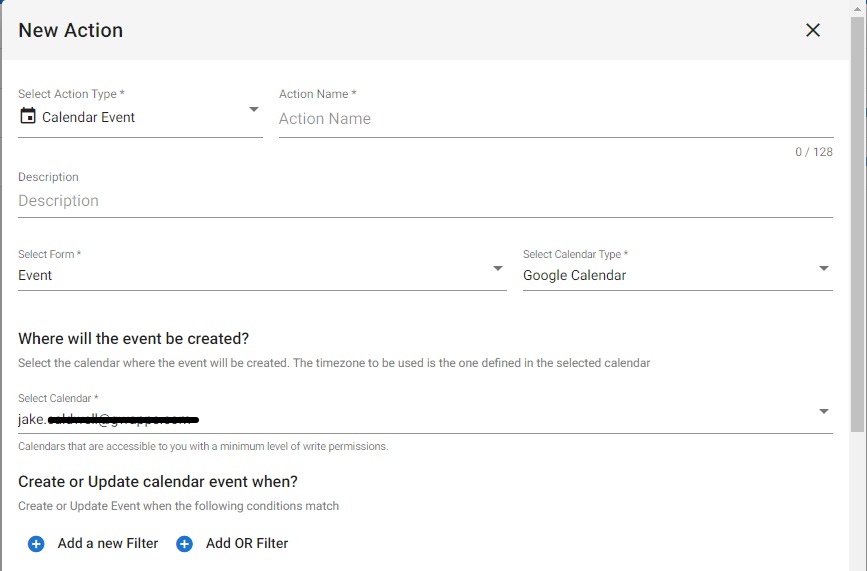
This action allows you to automatically create Google Calendar events from your applications. After authorizing access to your Google Calendar, you can create new calendar events based on a form in your app. Conditions and filters can be applied to ensure events are only created under specified conditions.
| Item | Description |
| Select Form | Select the form that contains the event data. |
| Select Calendar Type | Choose the Calendar Type. At the moment, “Google Calendar” is the only option. |
| Where will the record be created? | |
| Select Calendar | The Google Calendar where events will be created. |
| Create or Update calendar event when? | Set the conditions that determine whether or not the action adds /updates an event to the calendar. |
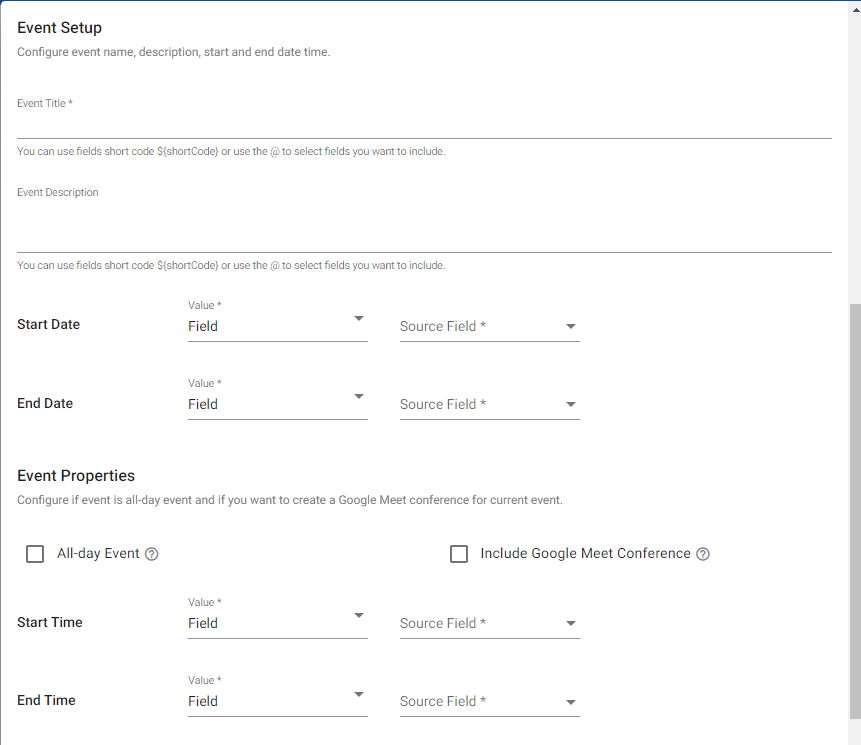
| Event Setup | |
| Event Title | The title of the event that will display on the calendar. You may use field short codes to dynamically determine the event title. |
| Event Description | The description of the event. You may use field short codes to dynamically determine the event description. |
| Start Date & End Date | Choose the fields or set a custom value for then Start and End date of events created with this action. |
| Event Properties | Set whether the event is an All-day Event, and if the event will include a Google Meet conference room link. |
| Start Time & End Time | Choose the fields or set a custom value for then Start and End time of events created with this action. |
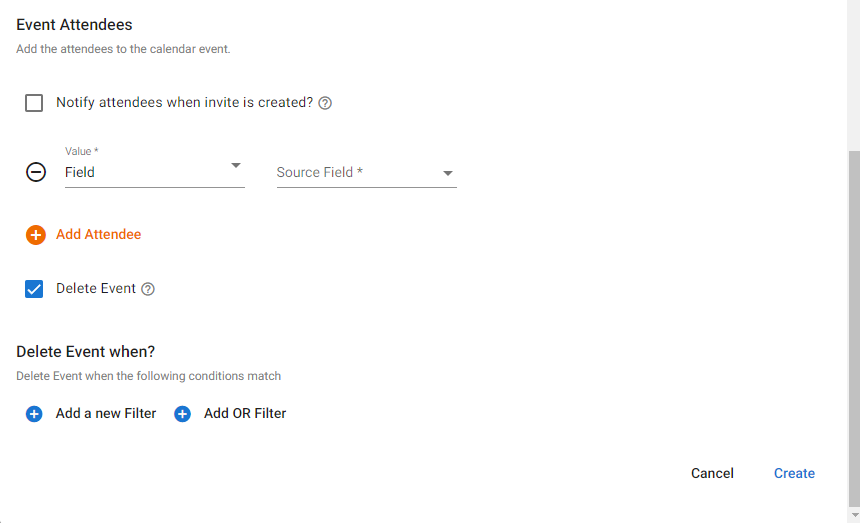
| Notify attendees when invite is created? | Optionally send a notification to all event attendees notifying them of their invitation. |
| + Add Attendee | Select to add attendees either based on form field(s) or custom value(s). |
| Delete Event | Optionally automatically delete an event when certain conditions are met. |